 REAPER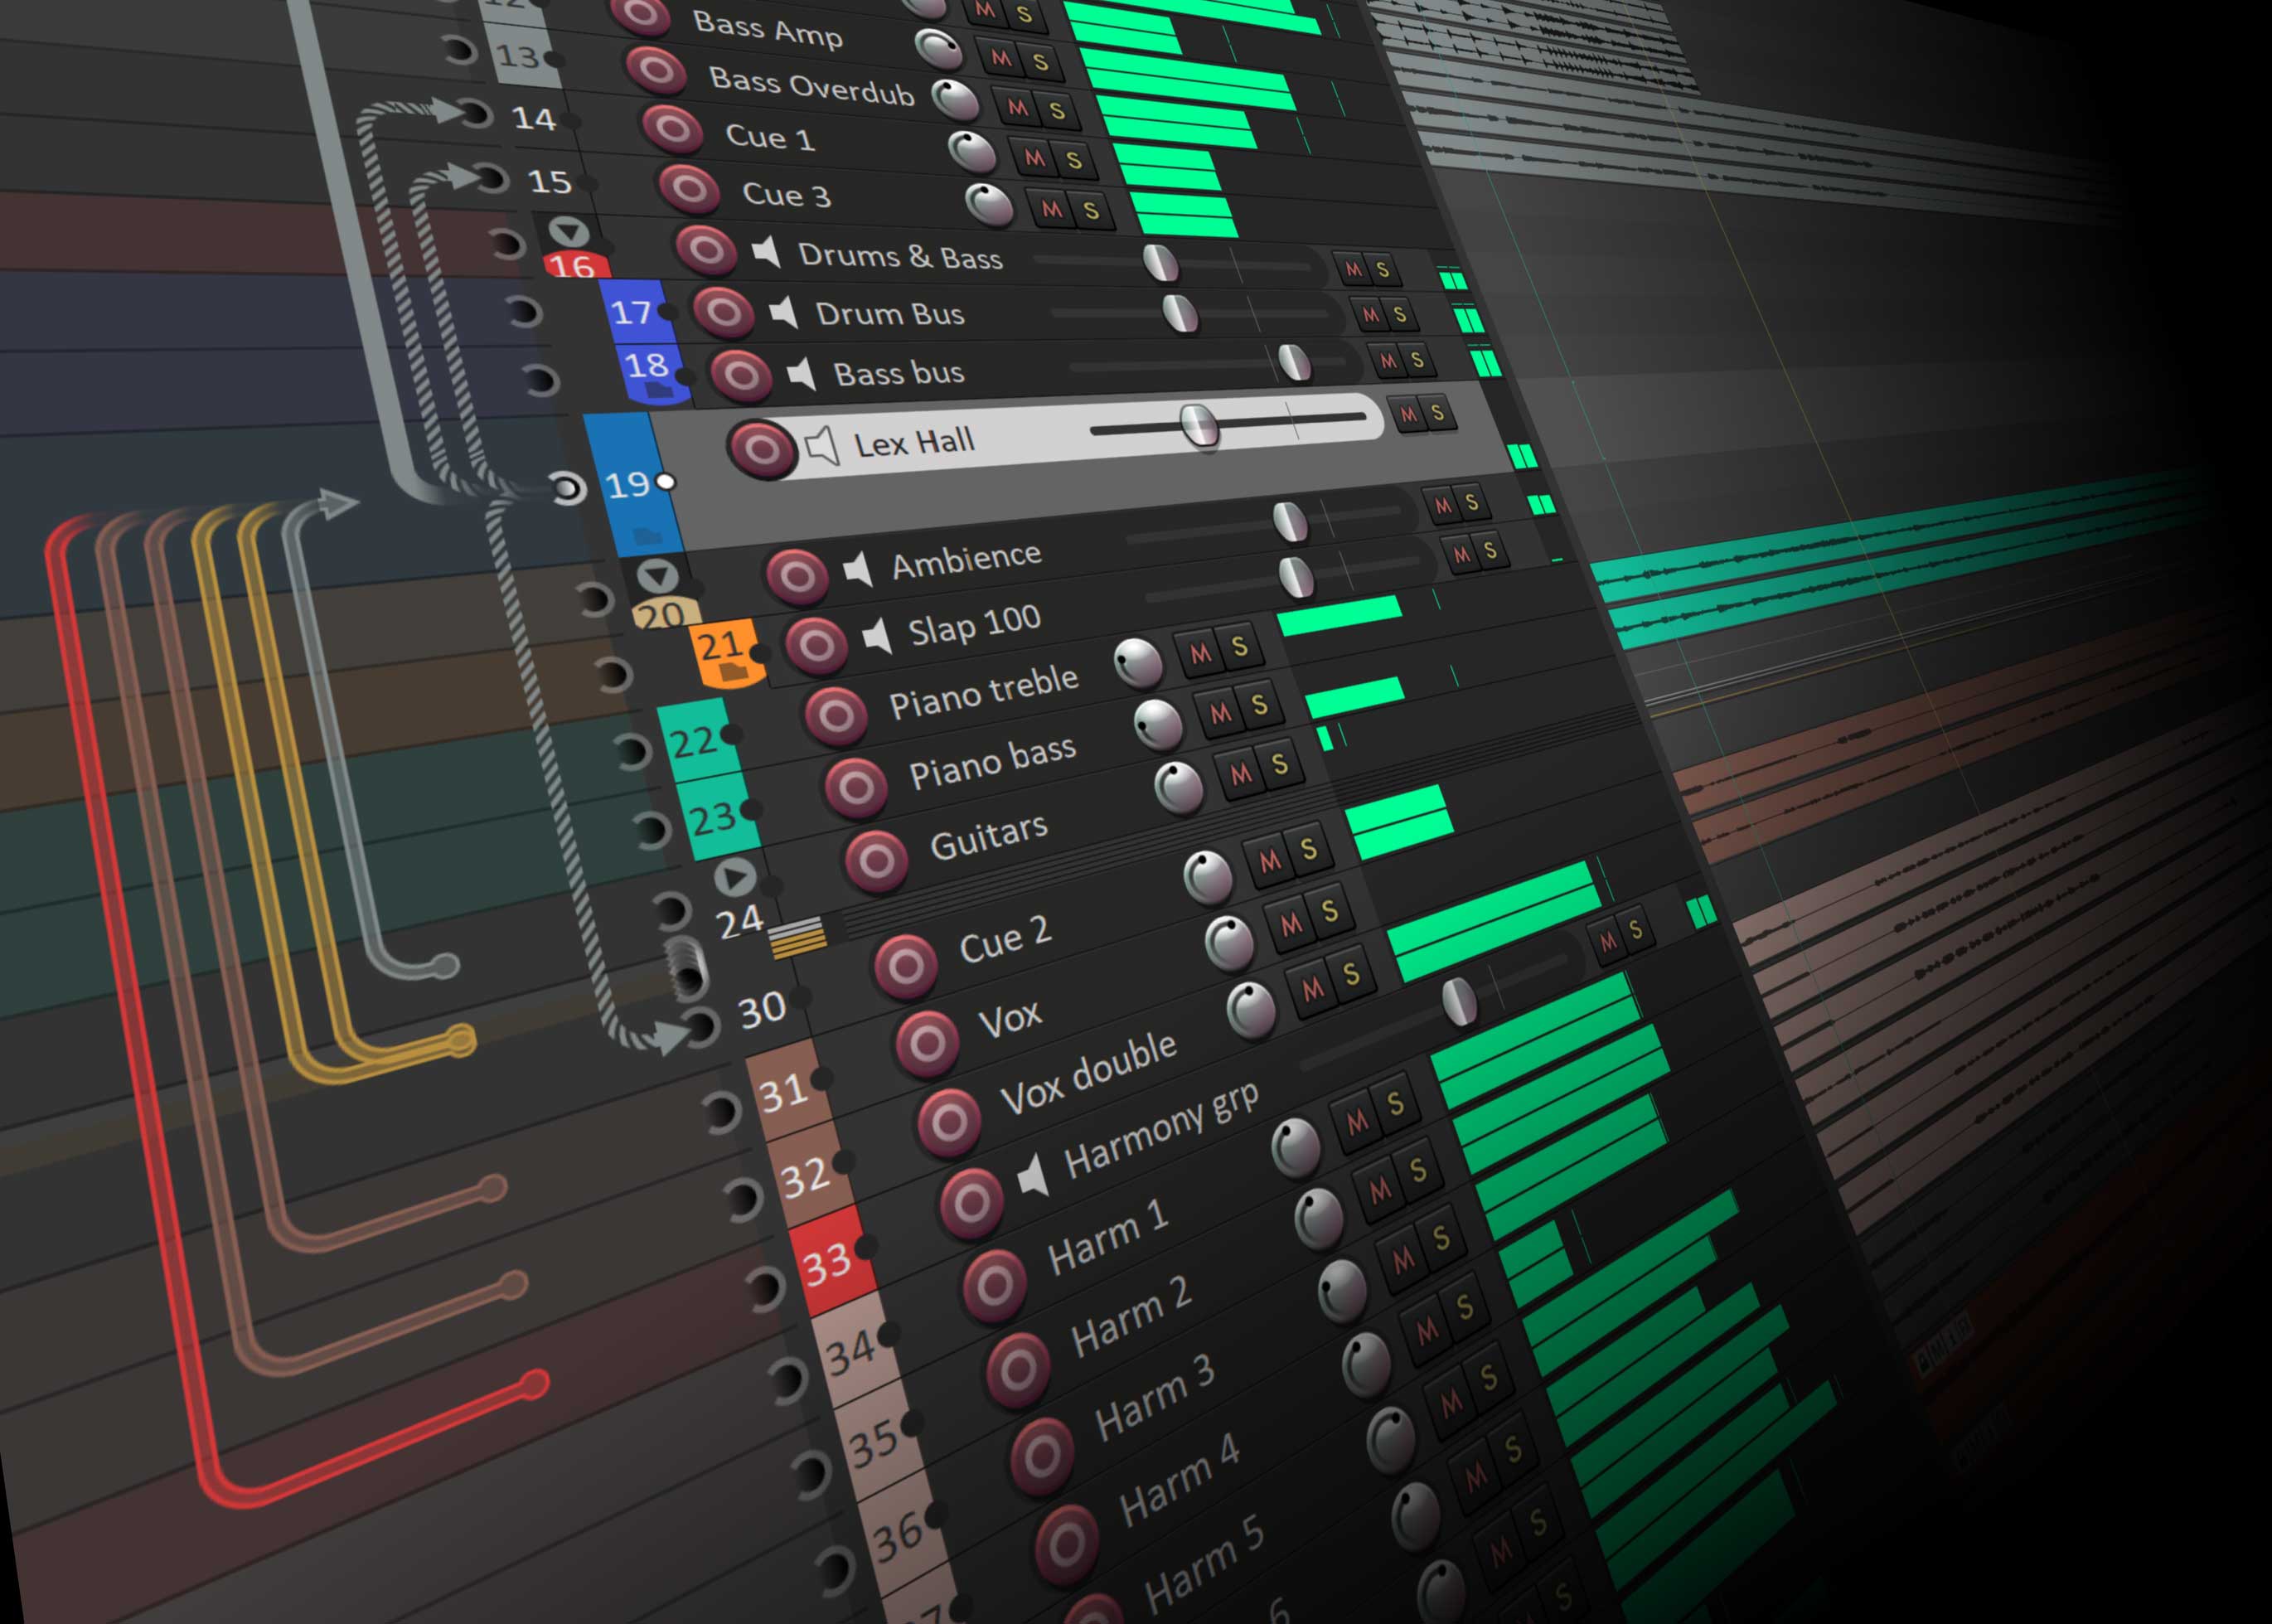

Page 1Graphical SendsVisual representation of Sends, Receives & Master/Parent Send
The flexibility and potential complexity of Reaper's routing is well known to us all, with great affection and maybe perhaps occasionally a bit of head scratching. If you're a visual thinker then this is going to make that a lot easier, less prone to error, and much much more fun. Graphical Sends reads all of Reaper's normal sends functionality for one selected track and displays them as source → destination cables, aligned to each corresponding Track Control Panel. The sends, the receives, the master/parent send, all at once.
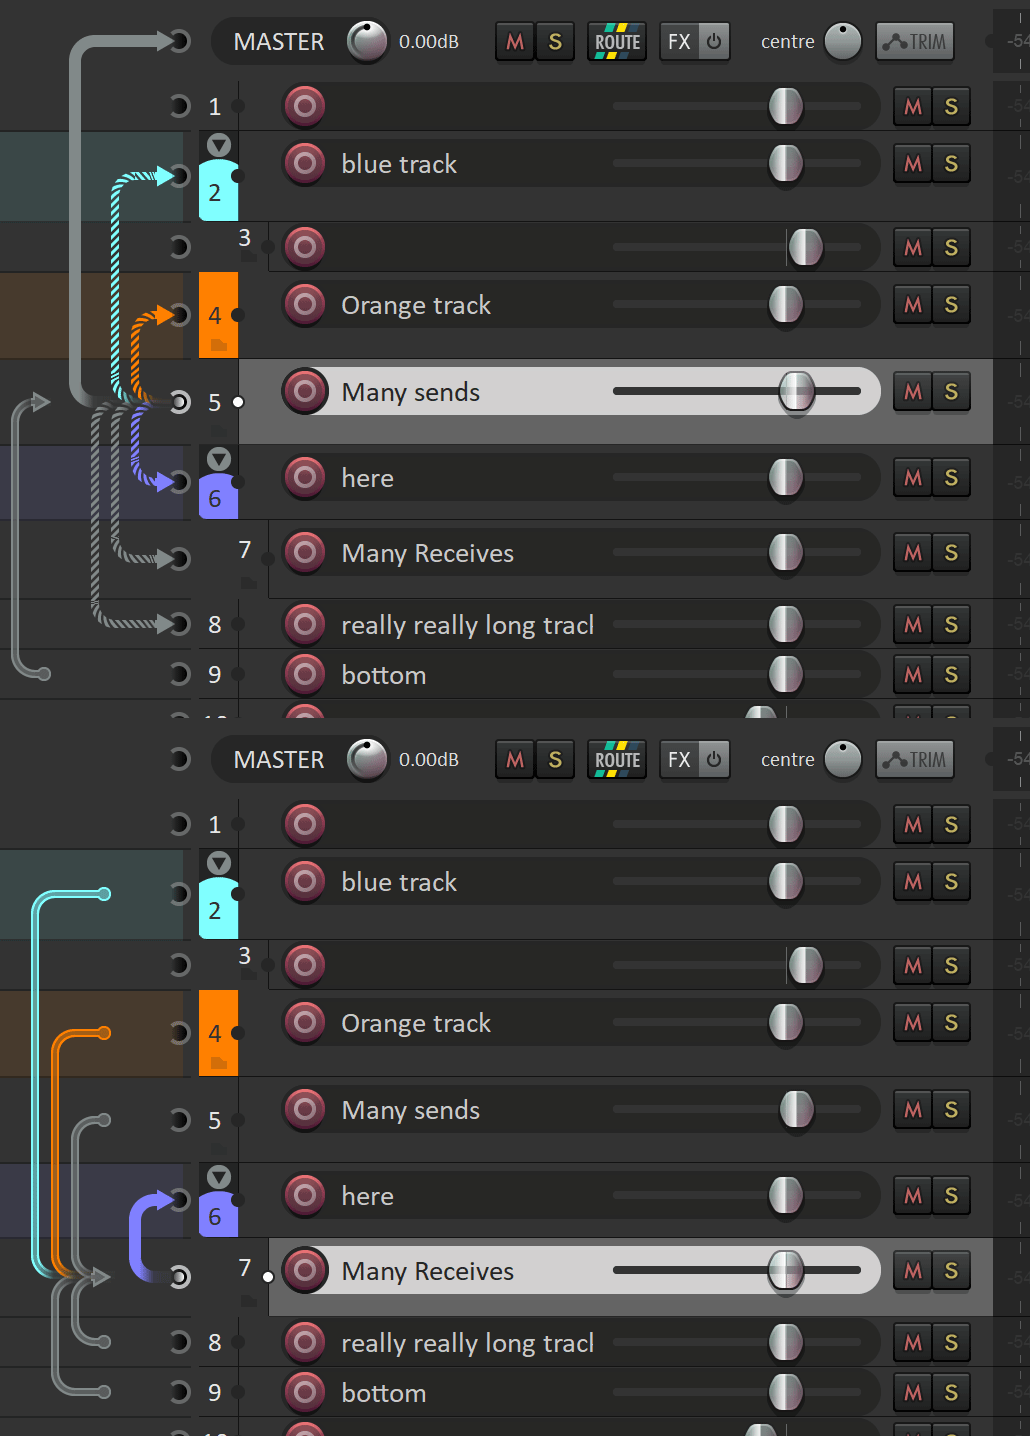
I'm very pleased with that, very useful. But it would be even more useful if they were fully interactive, right?
Interactive send patching & removal
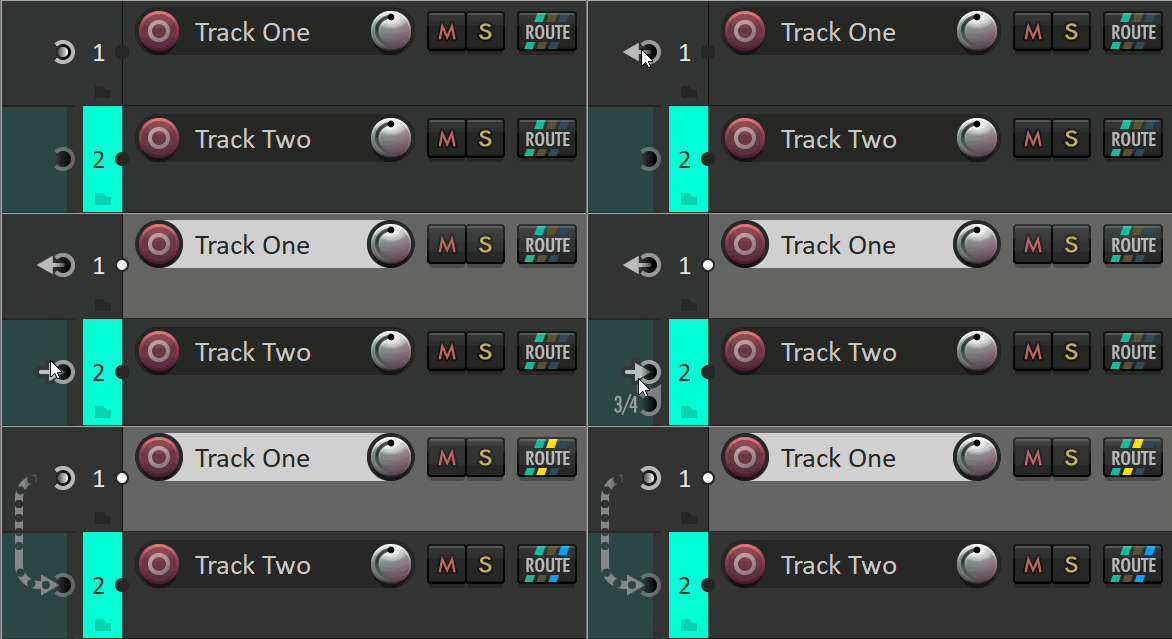
You can drag from one track to another to create a send...
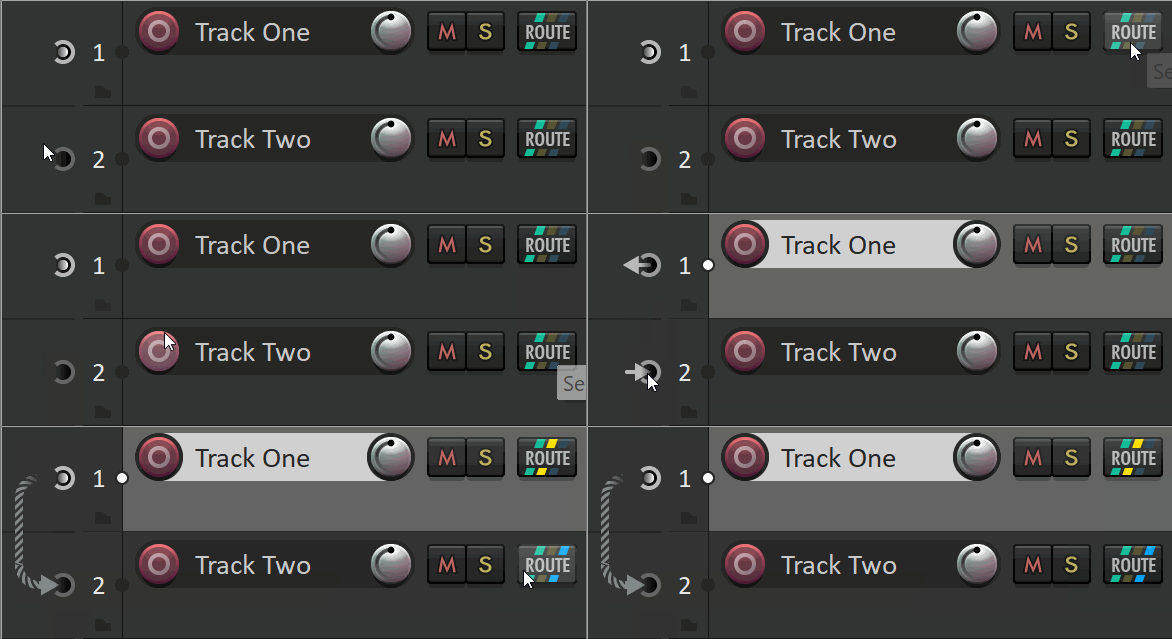
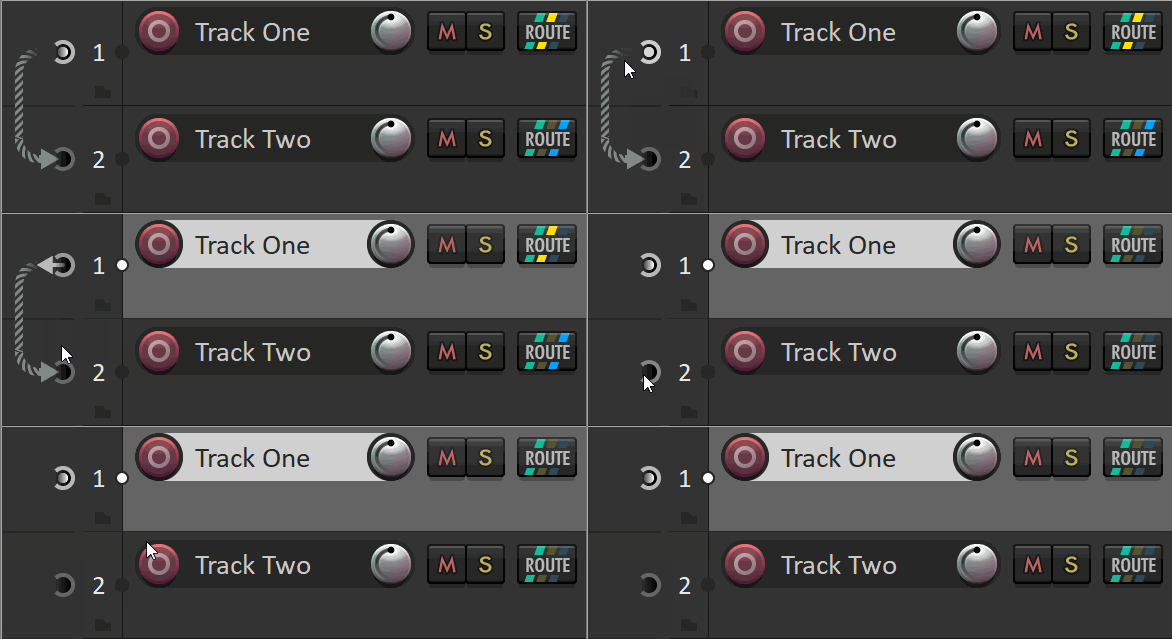
Regret doing that? Not a problem, you can drag again to delete it...
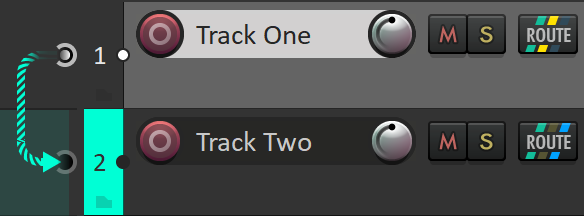
If your destination track has a custom colour, it'll grab that and use it...
If you find sending a sidechain to be a bit laborious, you'll like this; drag to a track and hold over the destination socket for a moment and there you go, choose channels 3/4 as the destination...
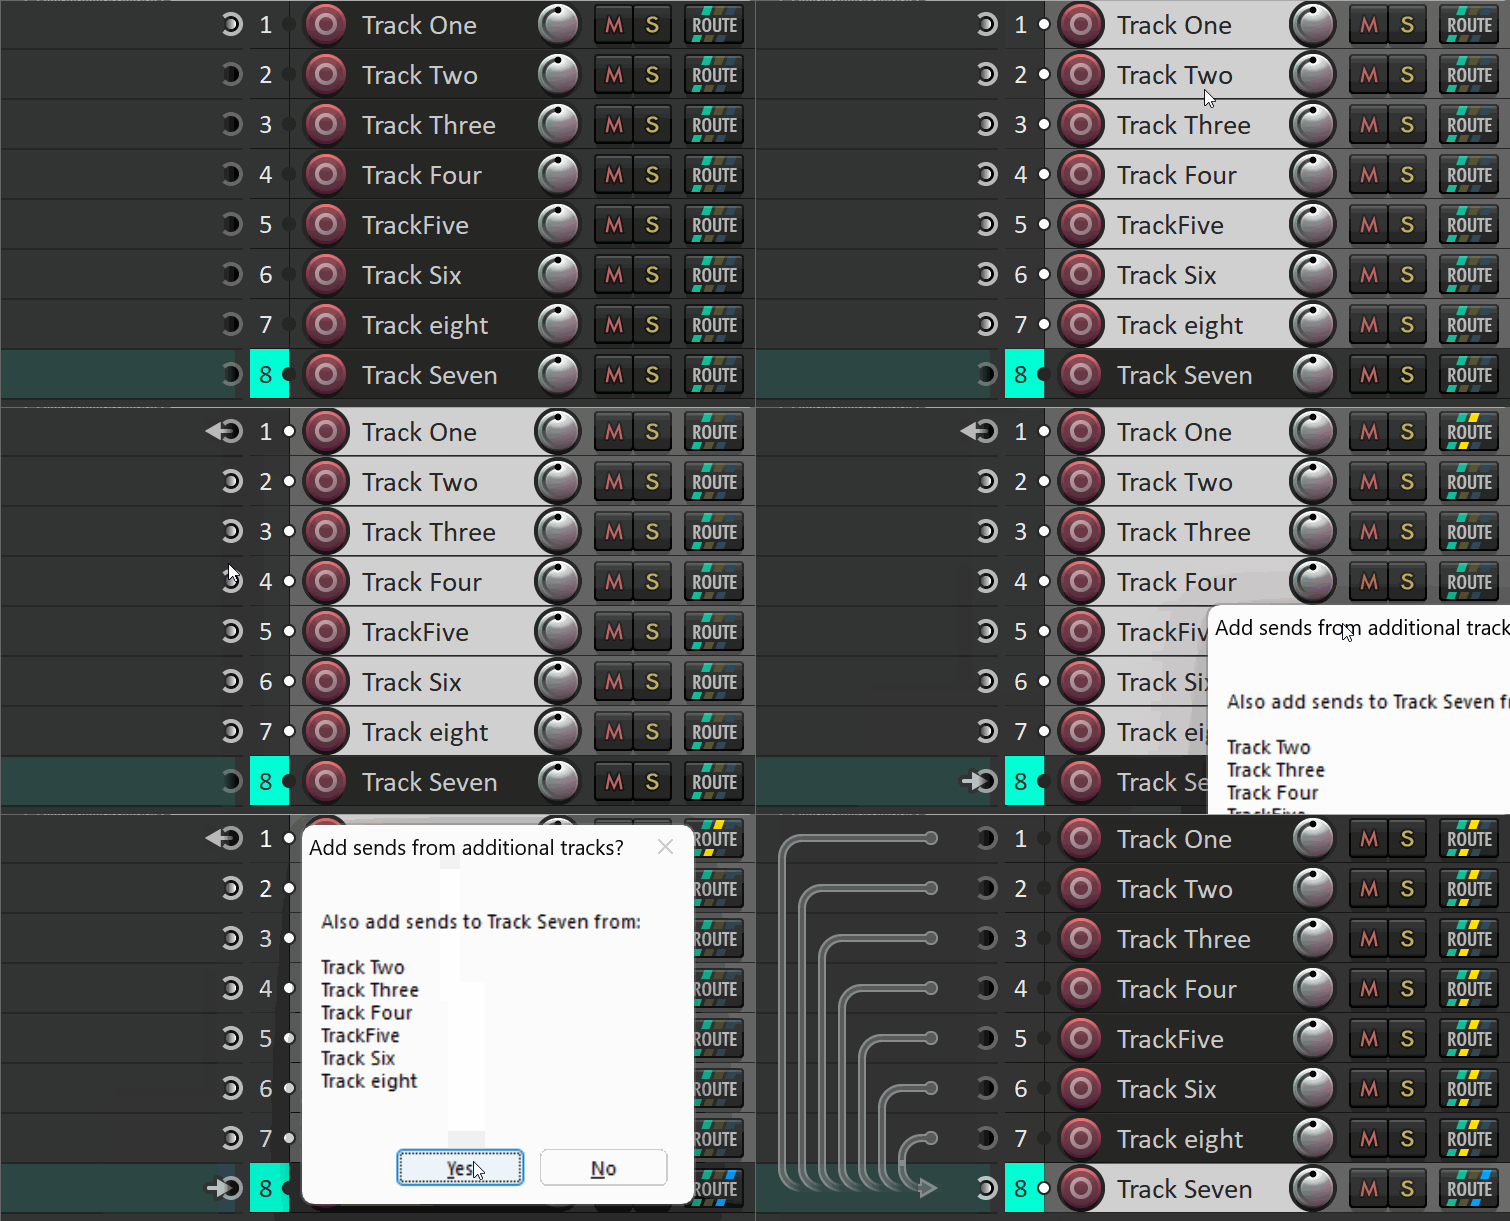
The script is all about a single track, but if you do have multiple tracks selected when you drag to create a send, then it'll give you the option to create sends from them as well...
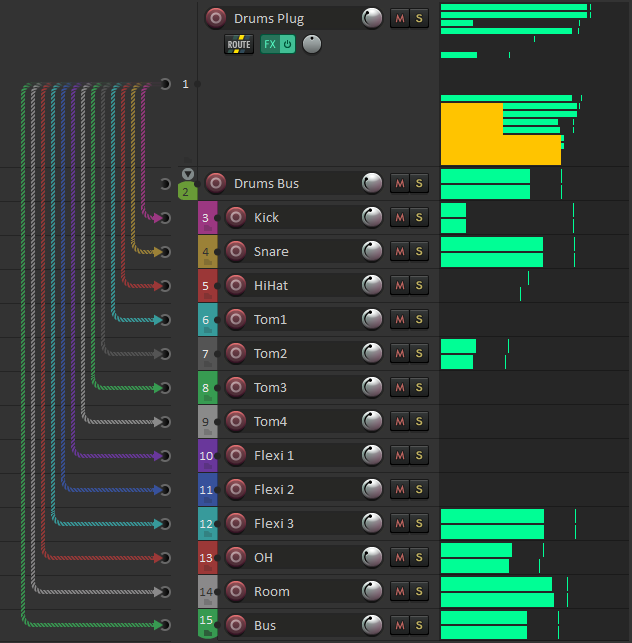
I'm not sure what the reverse of that might be, but if you use Reaper's 'build multichannel routing' command from a big multi-out plugin then you'll get a lot of sends, which really benefits from this graphical confirmation...
Patching shortcuts
My experience is that once you start working this way, you don't want to do it the old way. But what if a track is scrolled off screen? Or an annoying distance away? Well, here's two bits of contextual curation:
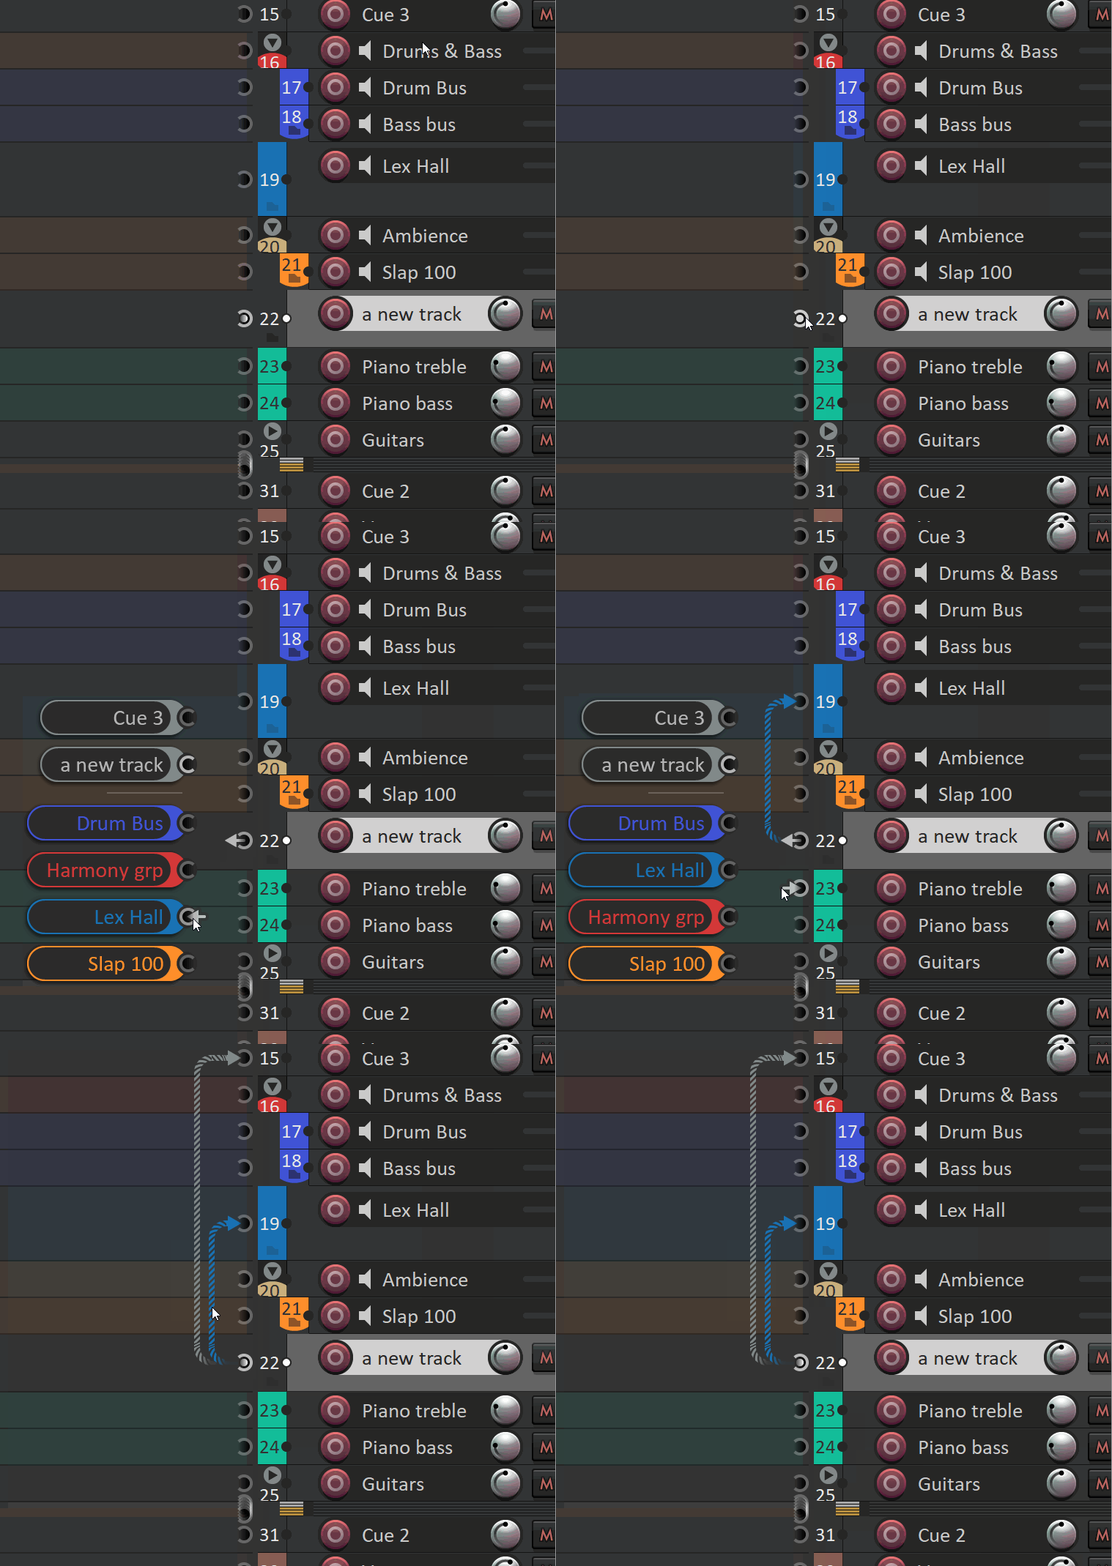
- Popular sends - If some tracks in your project are getting a lot of receives, you're more likely to route to them again, wouldn't you say? They'll be some manner of special project role, like your aux effects, or your cue buses, things like that.
- Recent sends - If you've recently routed to a destination, there's a better than average chance you're going to route to it with another track, because you're in middle of doing some manner of task.
Based on those assumptions, the script tallies which tracks those are, and offers them up next to your source socket as patch shortcuts, each with a handy destination socket...
Send Volume & Mute
So, if you can inspect them, and create them, and remove them... well obviously it would be a real shame if you couldn't tweak them. So you can, and right where it's the most visually informative - on the cable itself.
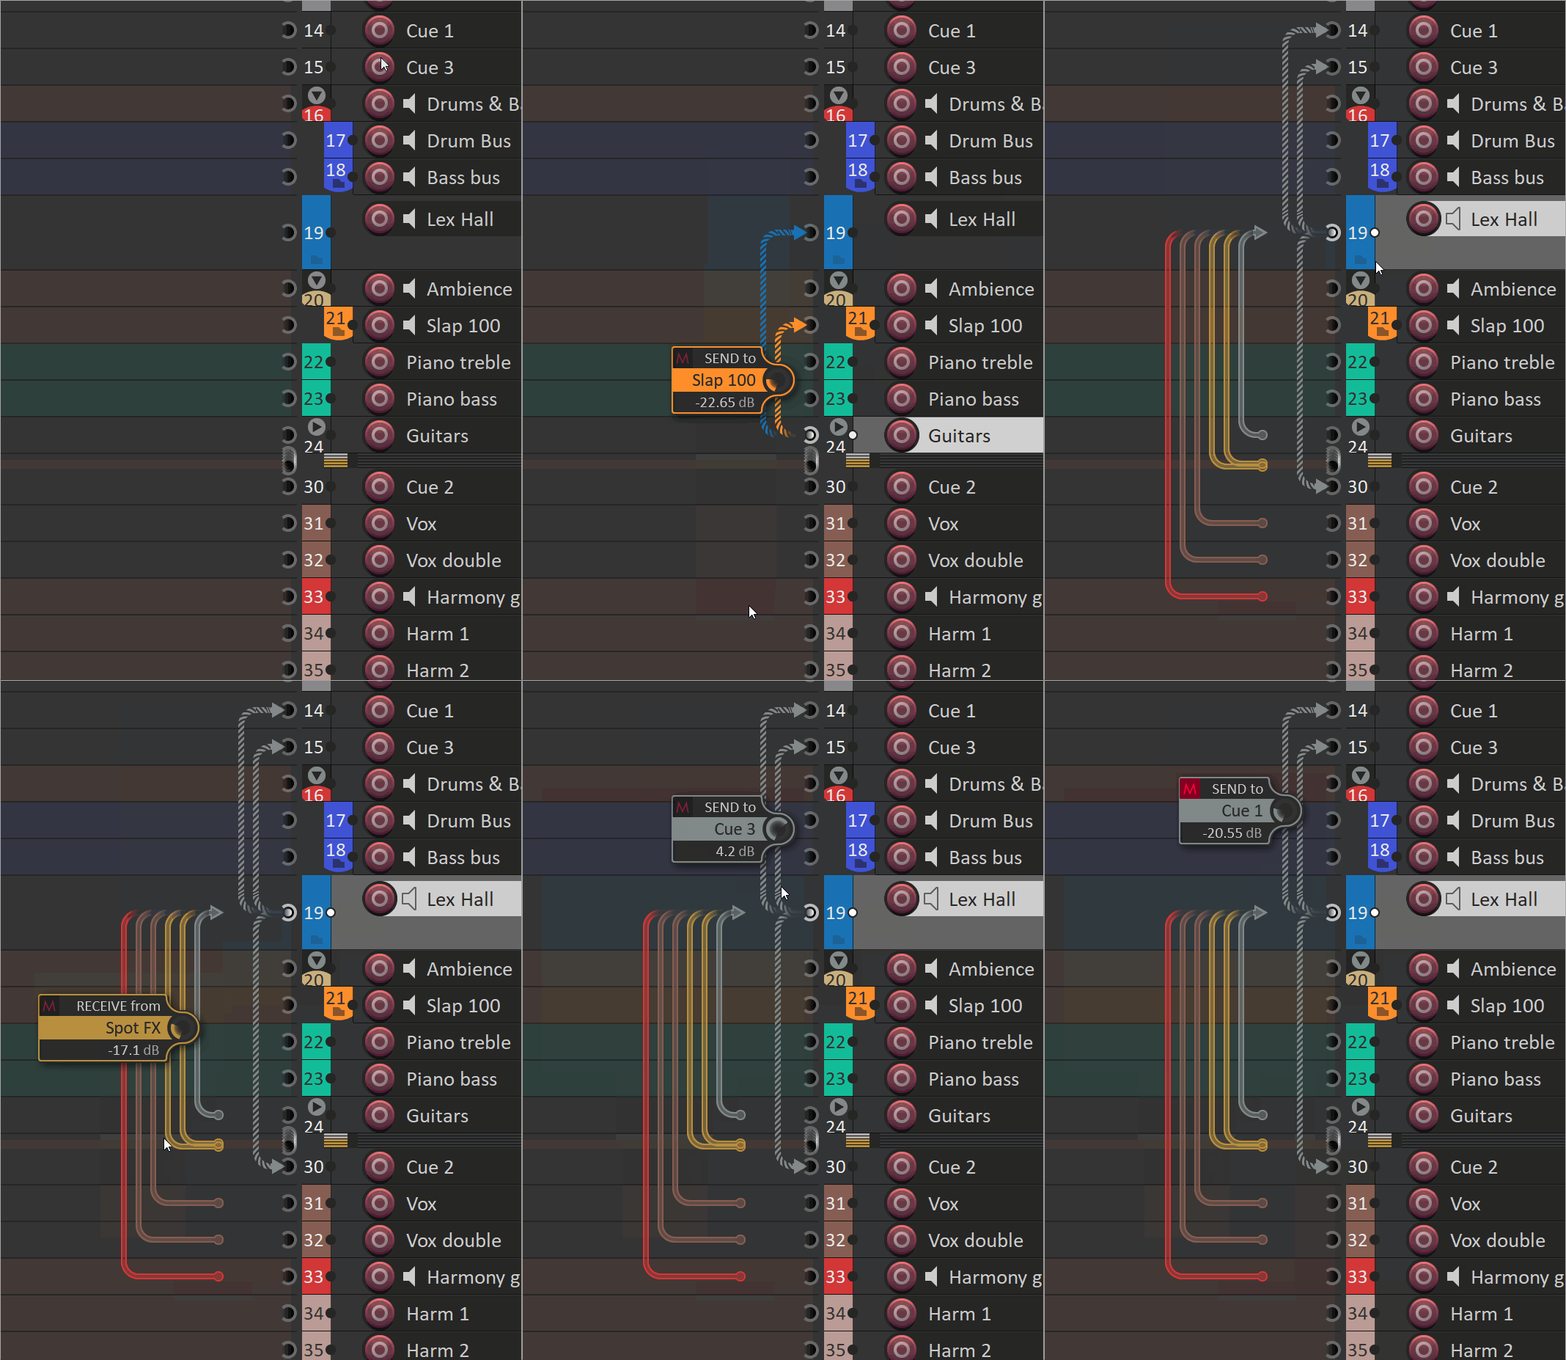
The floating control will appear when you drag on any cable - send, receive or master/parent (note that for a master/parent send the level of the send is the level of the sending track, so that's what it changes.) Dragging changes the level, mousewheel also works, or double click the value to type it in. Sends and receives can also be muted.
Toolbar
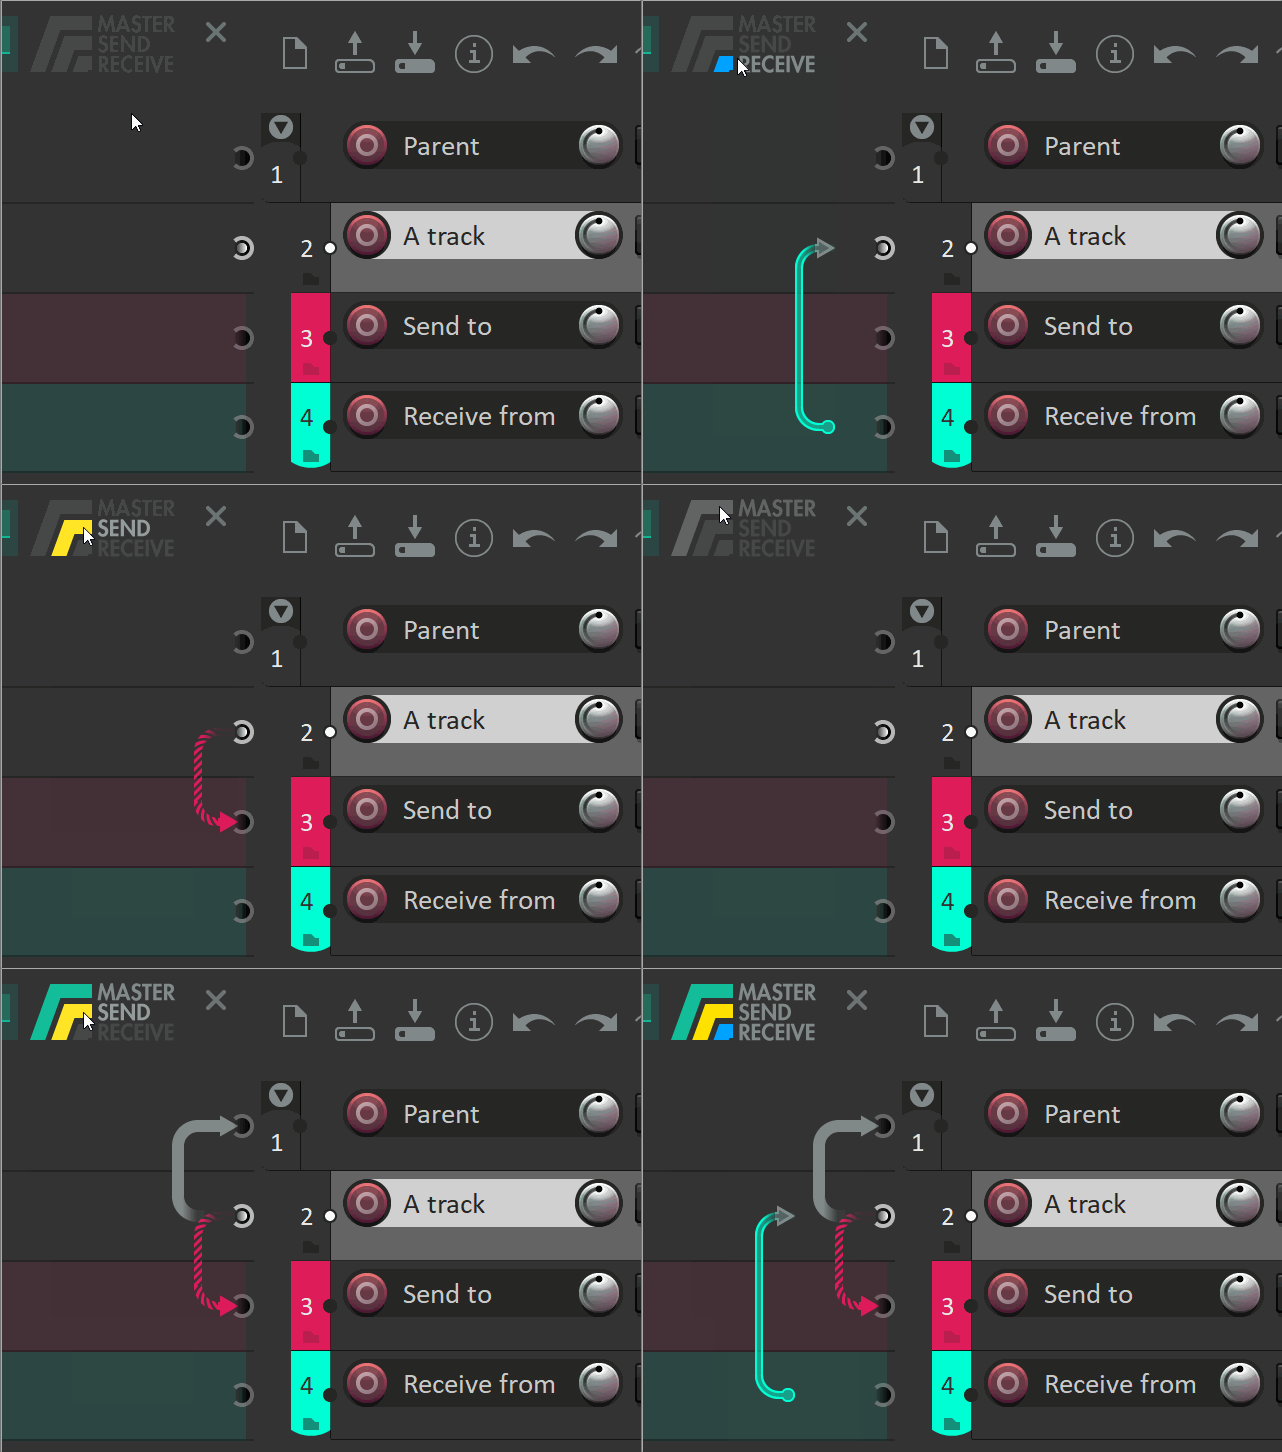
The toolbar has buttons for preferences, dock/undock, Master/Send/Receive enable/disable, a preview of the cable style for each of the cable types, a button to enable or disable the patching shortcuts, and a close button to close the script, which of course you'll never want to do ;)

Each segment of the Master/Send/Receive is clickable, so you can choose which combination of the three you want to see...
Cable Styling
I've made six styles of cable - Normal, Thin, Thick, Hollow, Dotted & Braided. Each will take on the custom colour if there is one on the destination track.
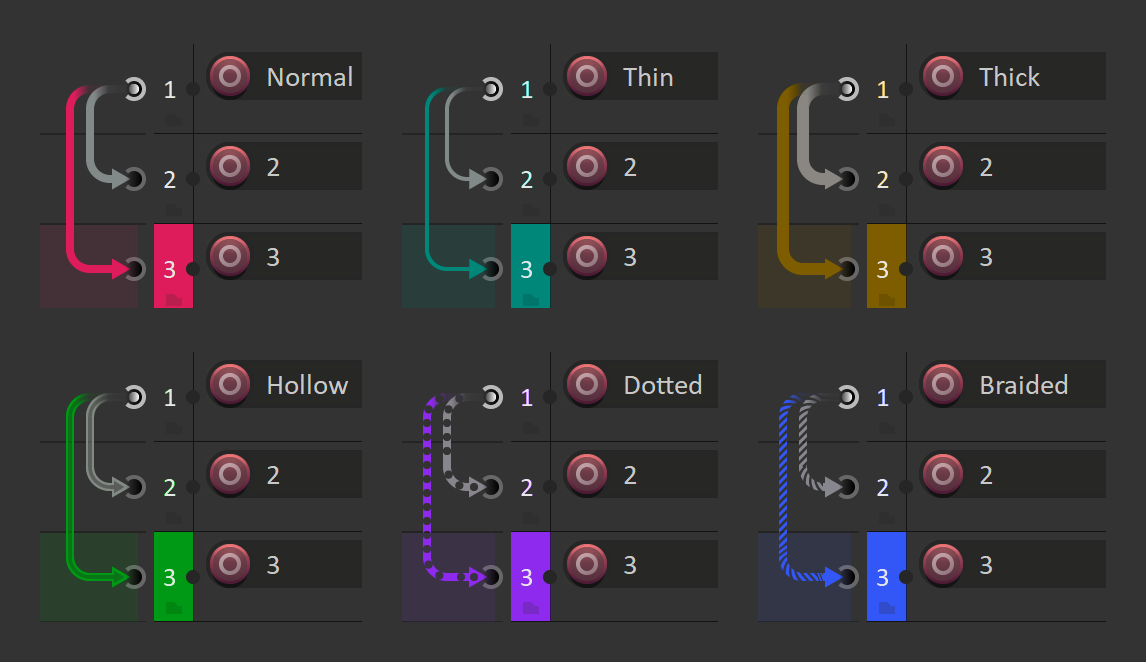
Which one you prefer, and which ones you feel should represent which type cable, has proved to be subjective and contentious. So... er... do a load of user preferences? Yeah...
Preferences
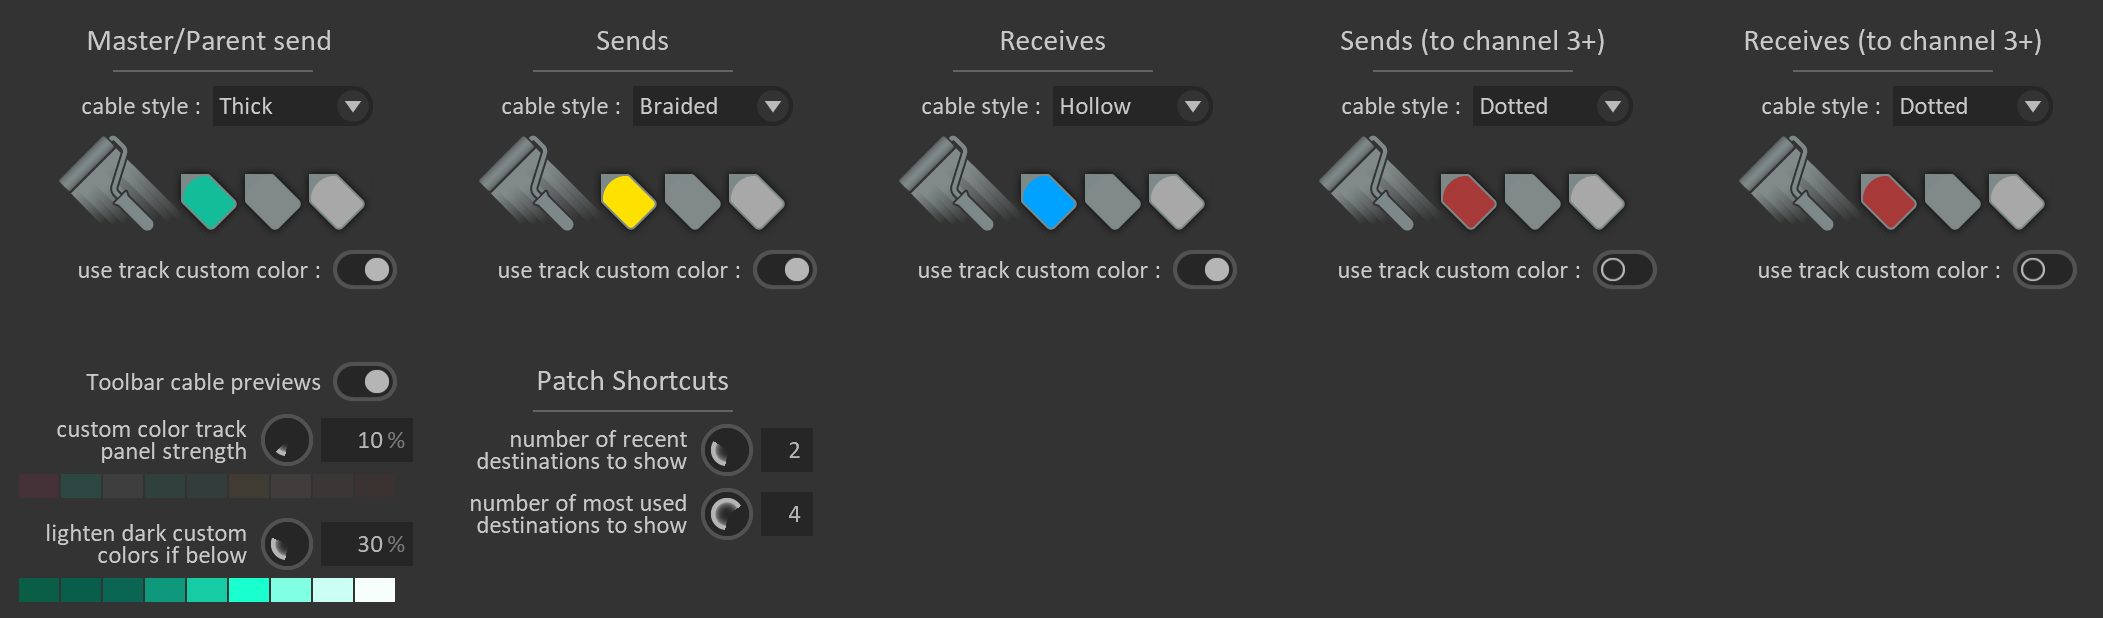
Each of the cable types have their own settings, and so do sends to channel 3/4 and receives to channel 3/4. For each, choose one of the six cable styles, the colour of the cable, and whether the cable takes on the custom colour of a destination track if it has one.
You can choose whether to show the cable style previews in the toolbar. You can adjust the strength of the custom colour fill for the track blocks behind the cables. You can tell the script to tweak the brightness of colours it uses for tracks with custom colours if they're a bit dark against the dark background.
If you've got the Patch Shortcuts enabled in the toolbar, there are preferences for how many of the most recent, and how many of the most popular, of the sends to show as patch shortcuts.
Housekeeping
HiDPI - Fully supports HiDPI/retina at scalings of 100% / 150% / 200%. The correct scale will be used if your Reaper HiDPI scaling is set correctly. Your Reaper HiDPI scaling is set correctly, isn't it, yeah? Are you sure? Been having any size issues of anything? Maybe have a look at that, yeah? ;)
Docking - Dock the script to the left of the TCP, then you can just leave it running and resize it in/out of use with the vertical divider. You may find the way Reaper does that docking to be a bit fiddly and confusing, but persevere, you only need to do it once; the script will remember where you put it next time you open it.
Key features added 1st Feb to 19th Feb
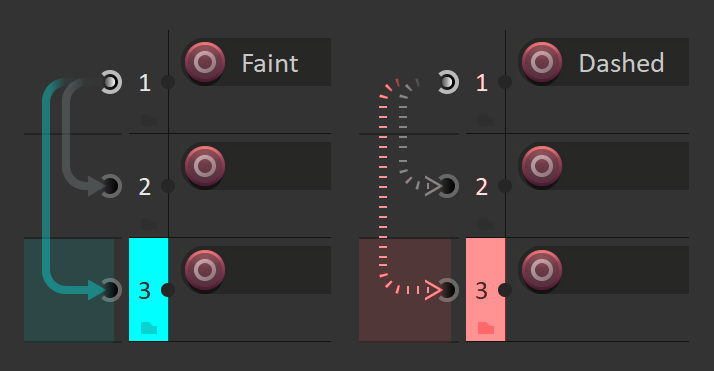
Two new cable styles - Faint & Dashed:
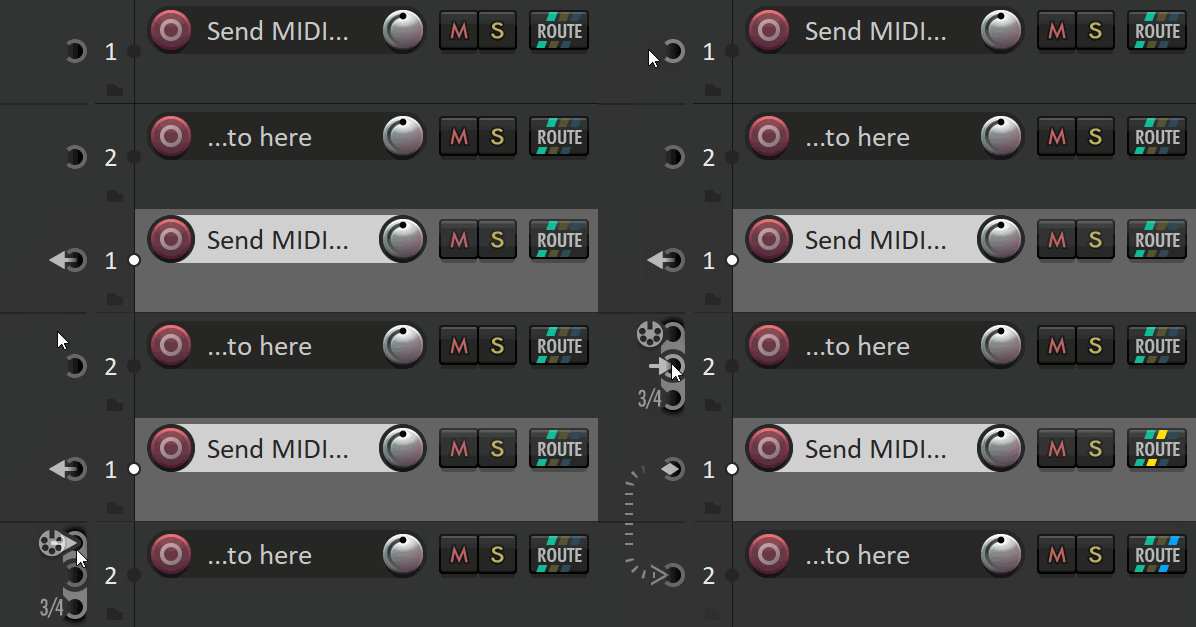
You can now also create 'MIDI only' sends, drag and hold over a destination socket to see the MIDI socket:
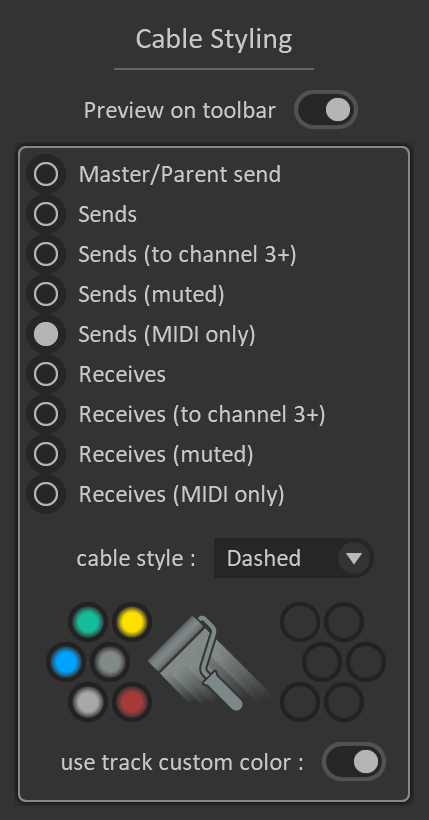
Additional definable styles for Send and Receive cables to take when they are muted or MIDI only. Unified preferences section for all the styles, with palettes for six preset colours and the six most recent user chosen colours:
also...
- Added functionality for dragging over the cable/socket of a master/parent send to toggle the track's master/parent send state.
- Double clicking on a cable now resets its value to zero.
- Mousewheel adjustment of the send level of a cable.
- Support for TCP pinned tracks.
- Preference for the rate to follow arrange view scrolling.
Full Change Log
Many, many thanks to the testers.
Page 2Graphical FoldersVisual representation of Folders & Envelopes
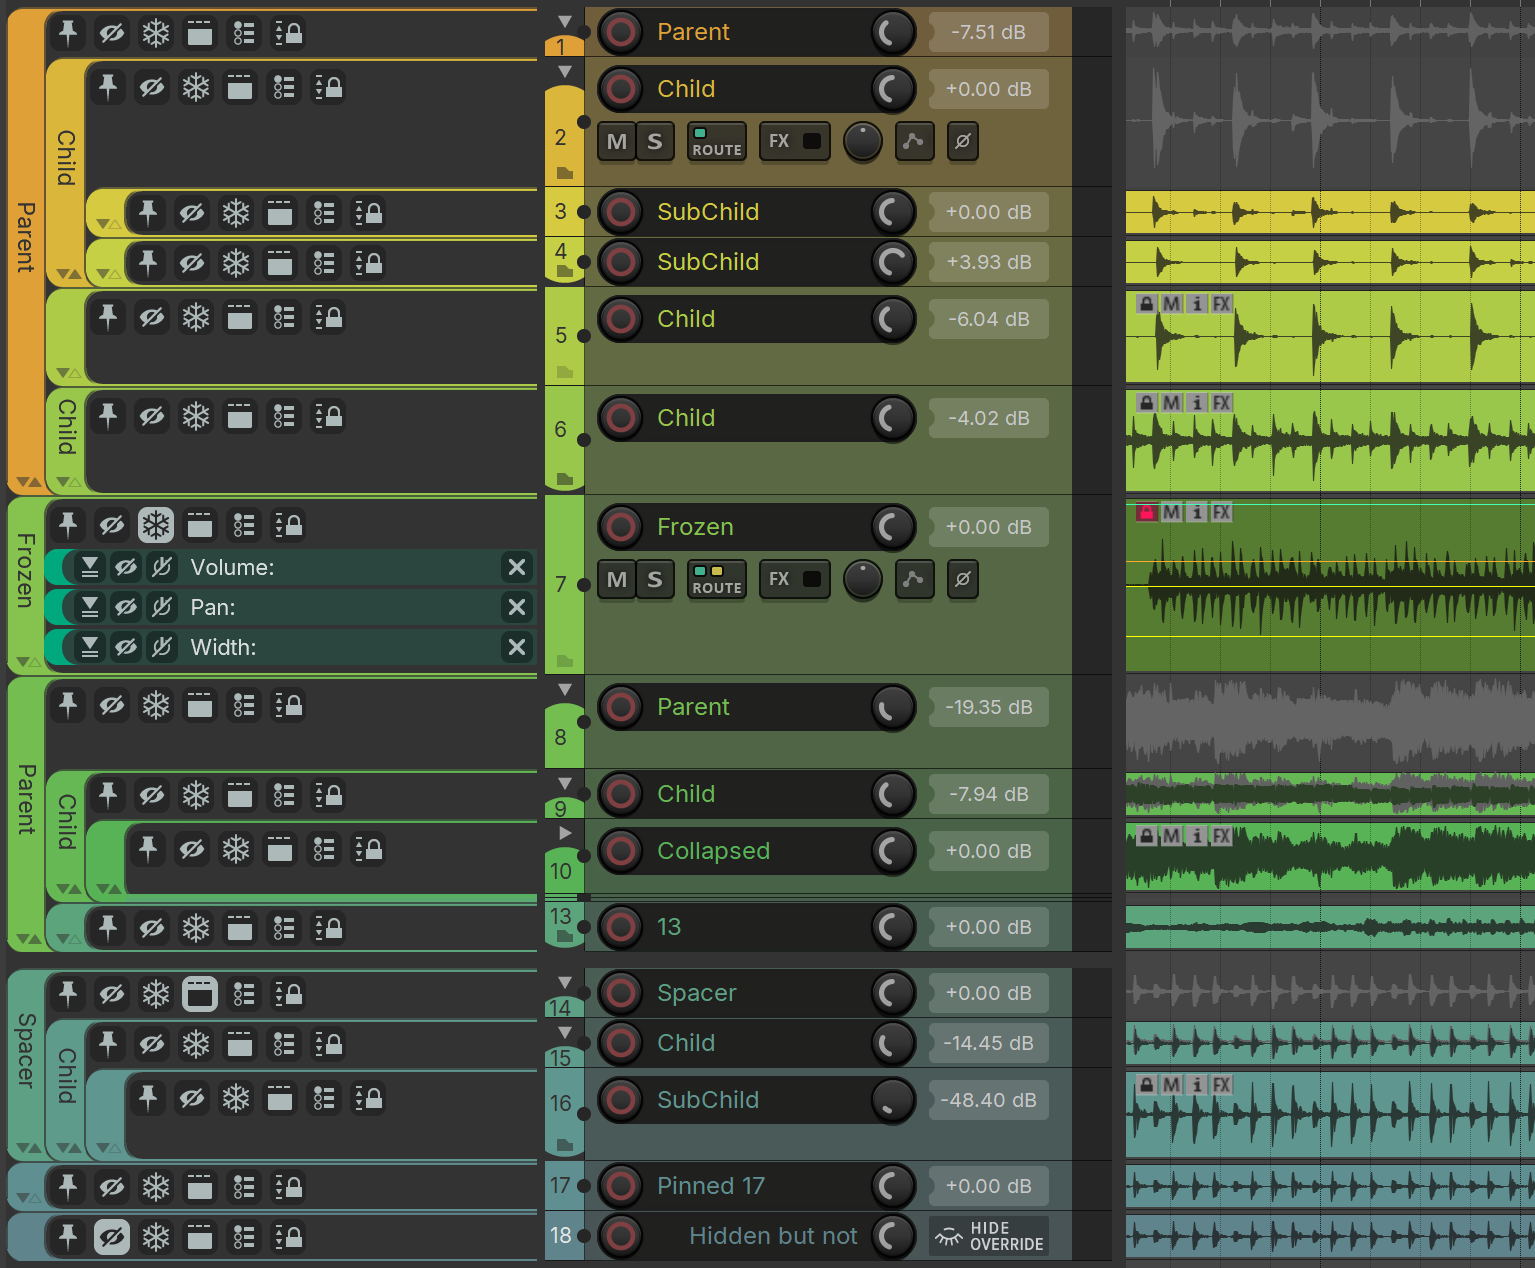
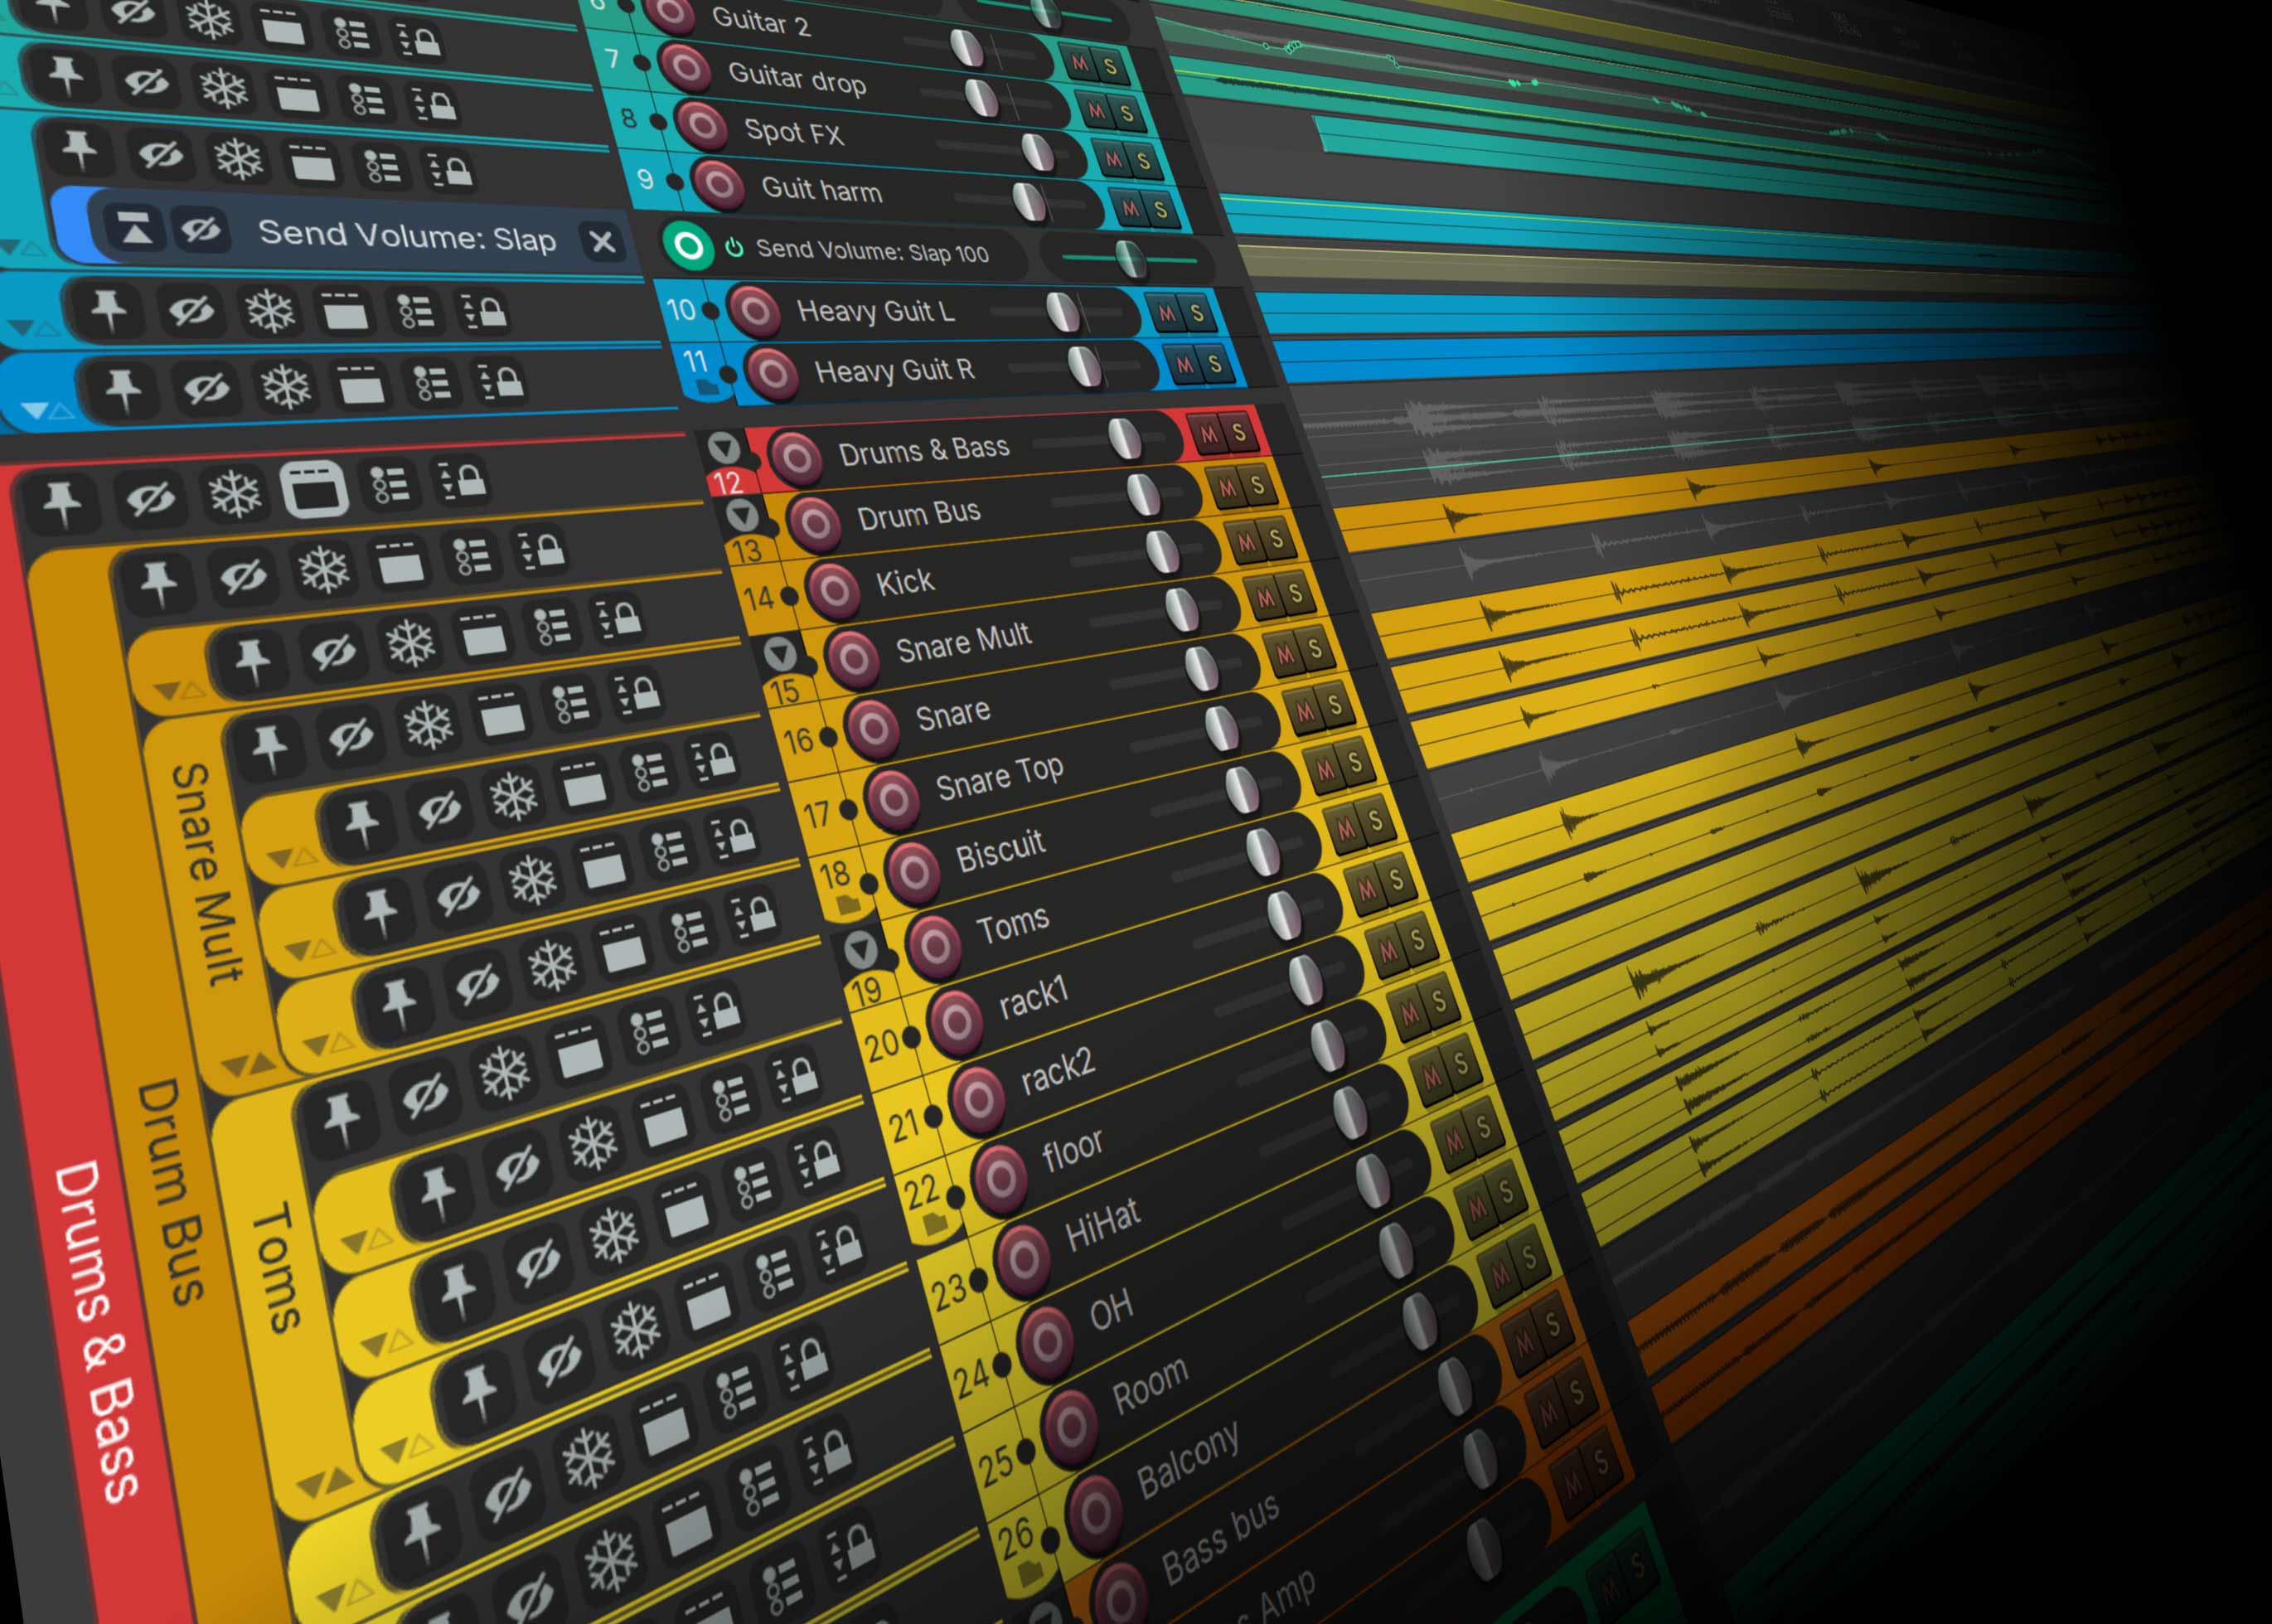
REAPER has extraordinary power in its effectively unlimited nested folder functionality, and by making that graphical I have sought to make that power easier to set up, clearer to read, and a bit more joyful to interact with. For many years I've represented that in themes using indentation, but some other DAWs do their (sometimes perhaps a bit crap) folder/bus by representing the folder enveloping the child, which is very pleasing. So I've nicked that.
Here's the core interaction: one graphical track and another below it, make the top one into the folder parent of the lower by dragging its bottom left corner over it:
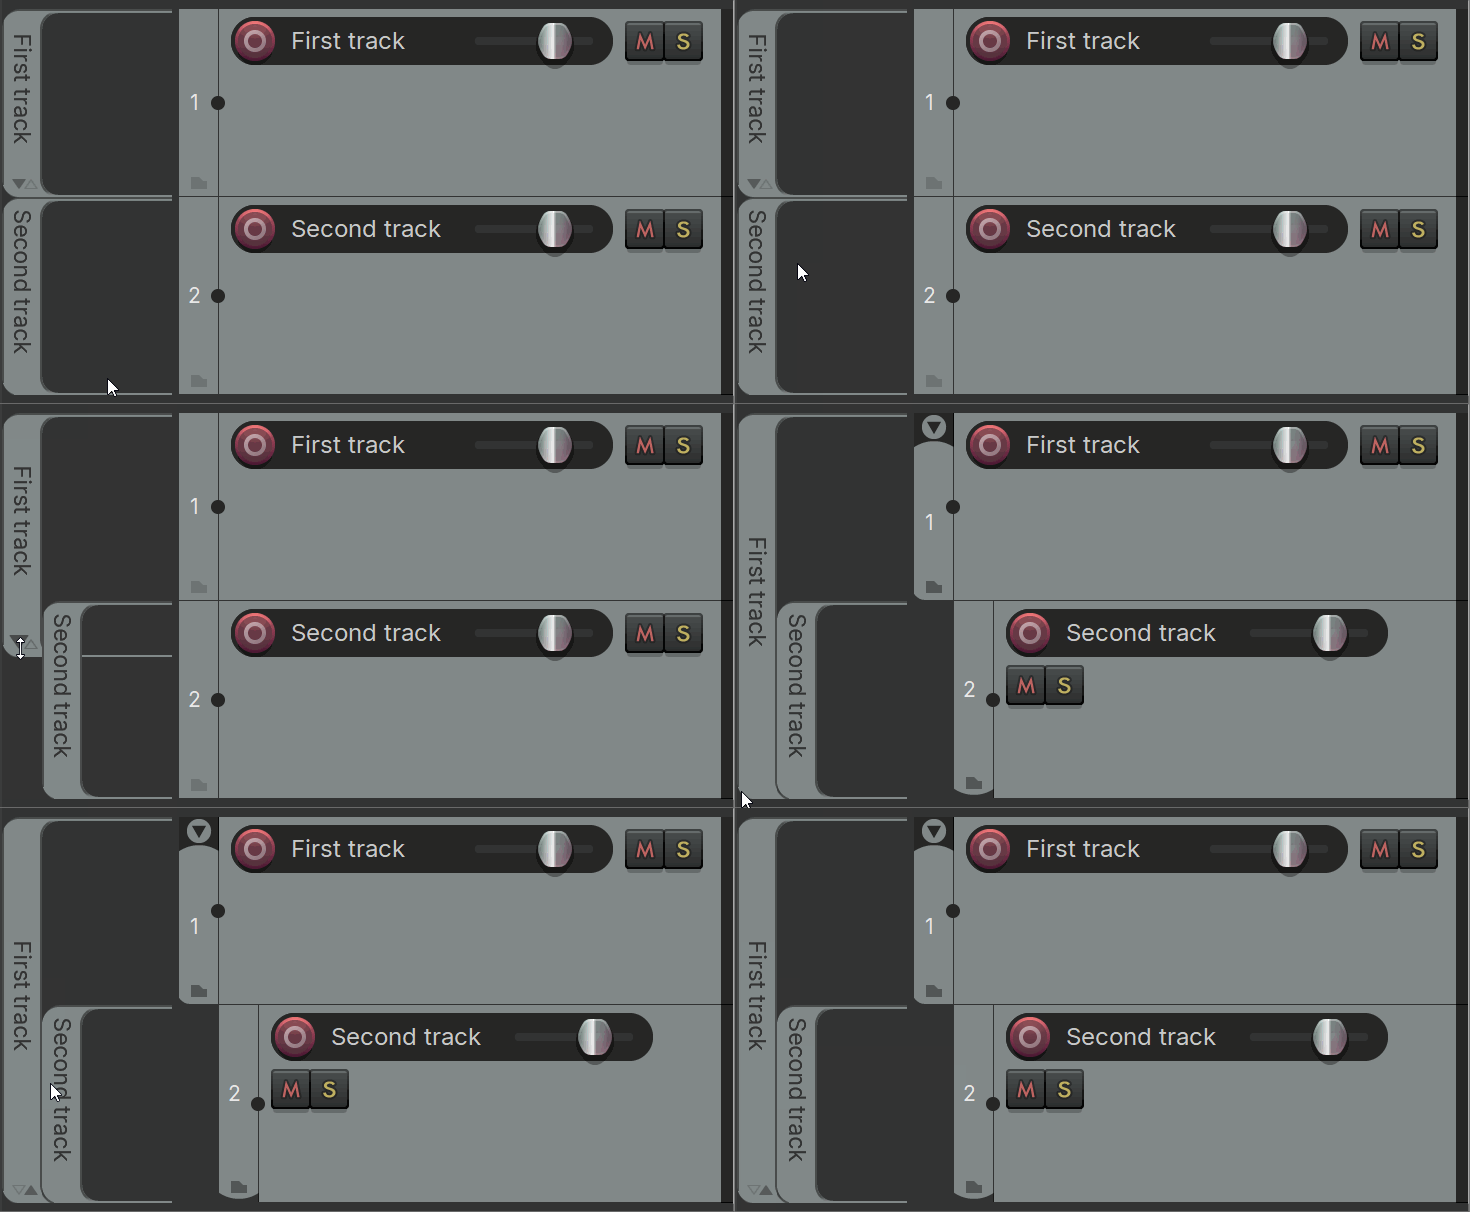
and, naturally, the way to do the opposite is ...to do the opposite!
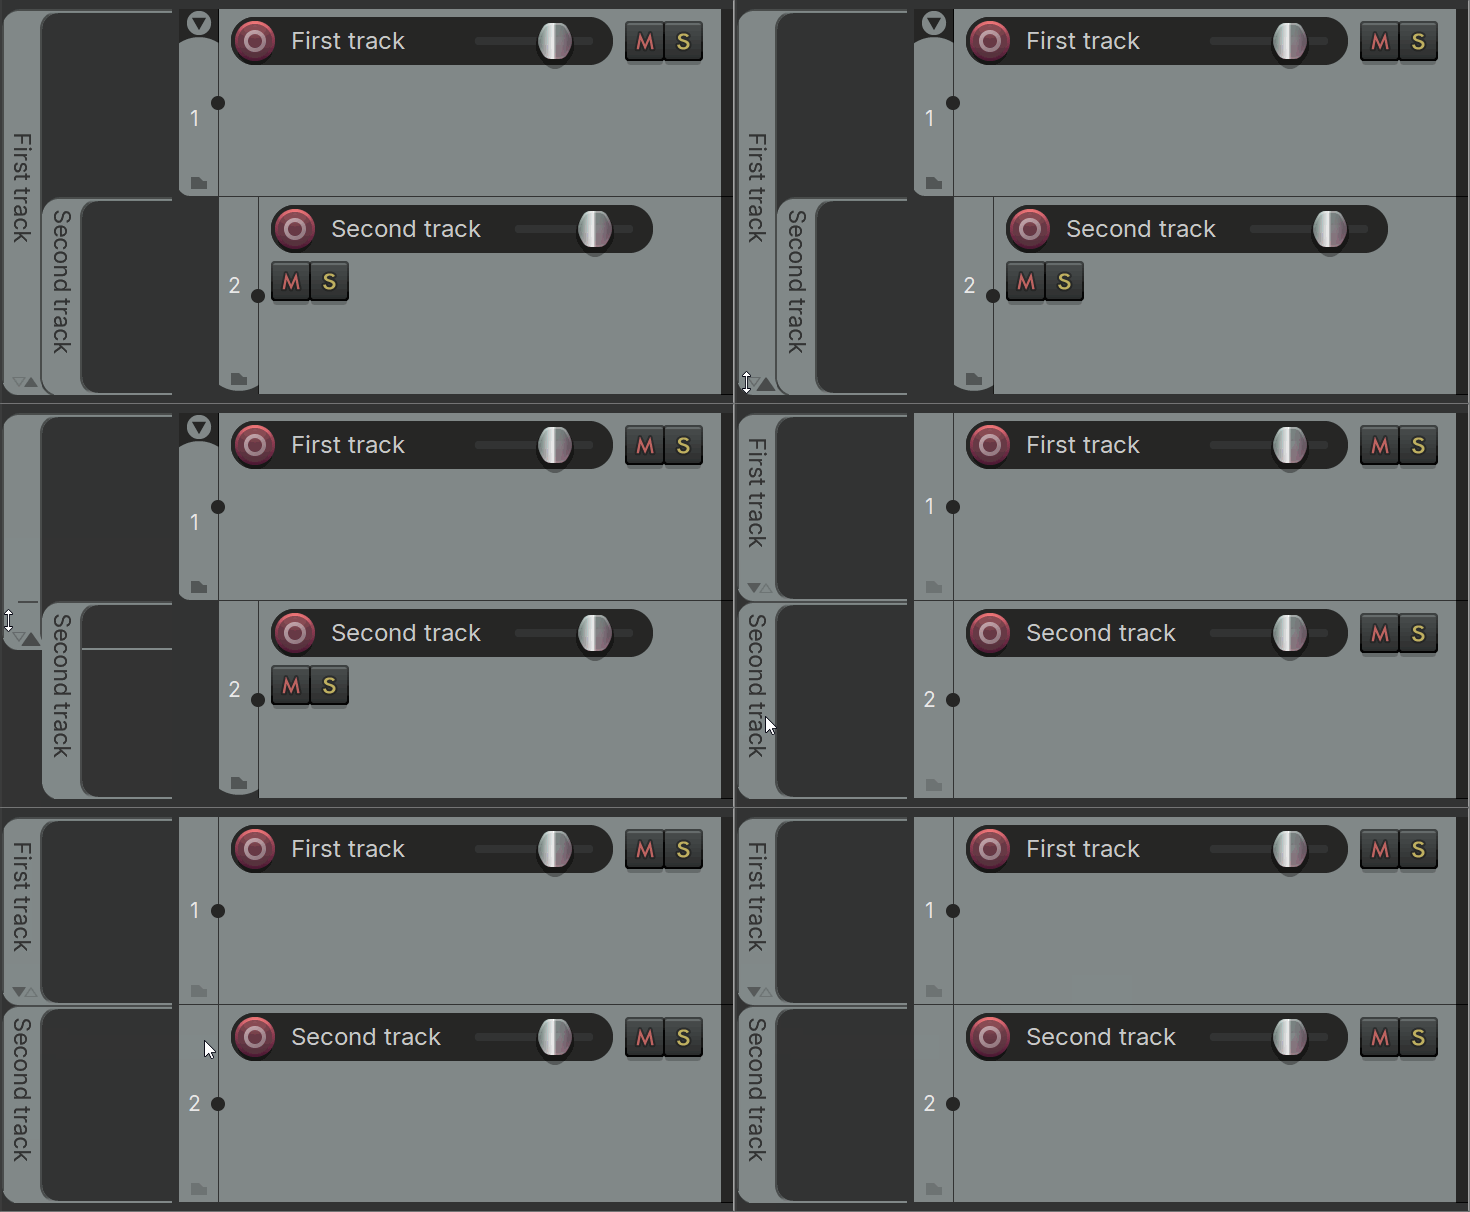
This leaves you with two representations of folder structure at once, so I've provided a toolbar button 'Remove theme folder indent' that will zero out the Reaper's folder indentation (requires Default 7.0 theme).
If your track has a custom color, the graphical track will take on that custom color.
The bottom left corner control will change based on what up/down/both dragging operations are logically available for that particular graphical track. When dragging up to reduce a folder, tick marks will show how far to drag to remove each child. Complex nested folder structures can be created and amended with ease and absolute clarity.
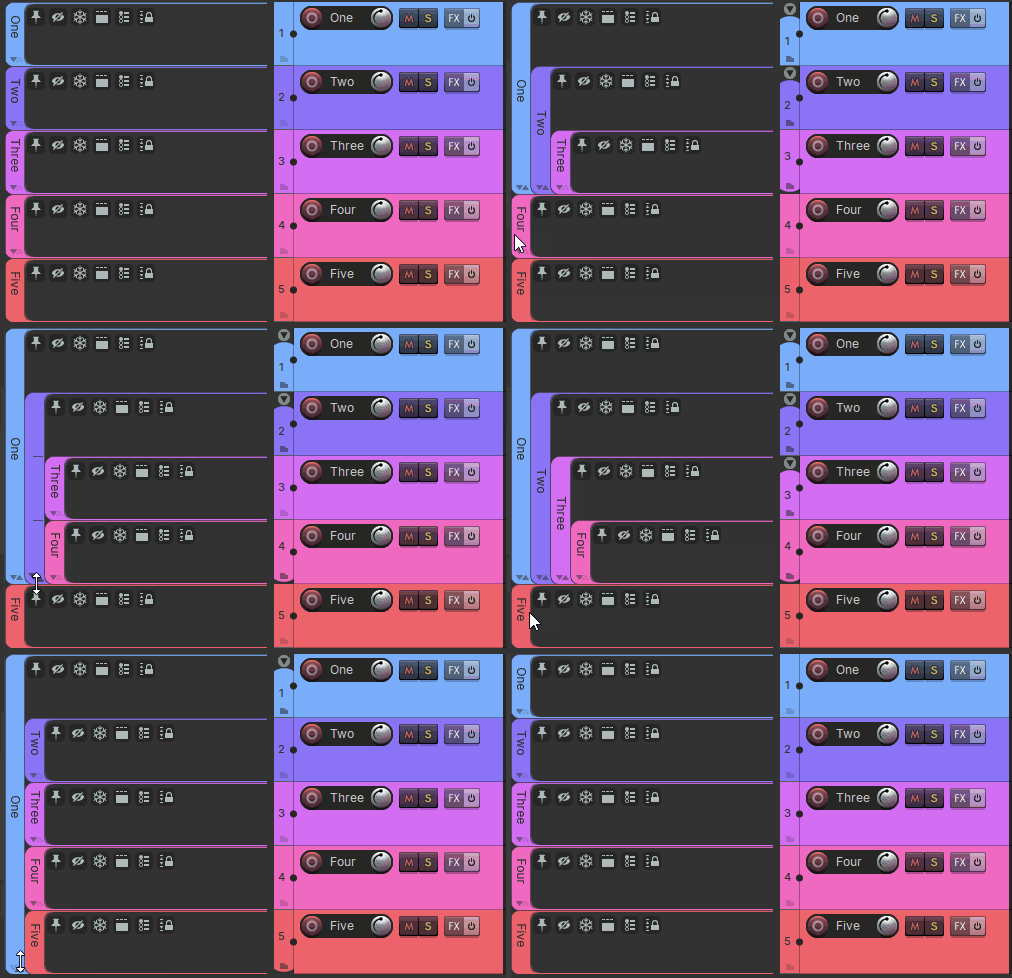
Proportional Resizing
If you grab the bottom edge of a track in Reaper, you resize it. But since Graphical Folders knows if that track is in a folder it gets to provide a satisfying alternative: grab the bottom of its edge, and that track and all of its siblings will proportionally resize together...
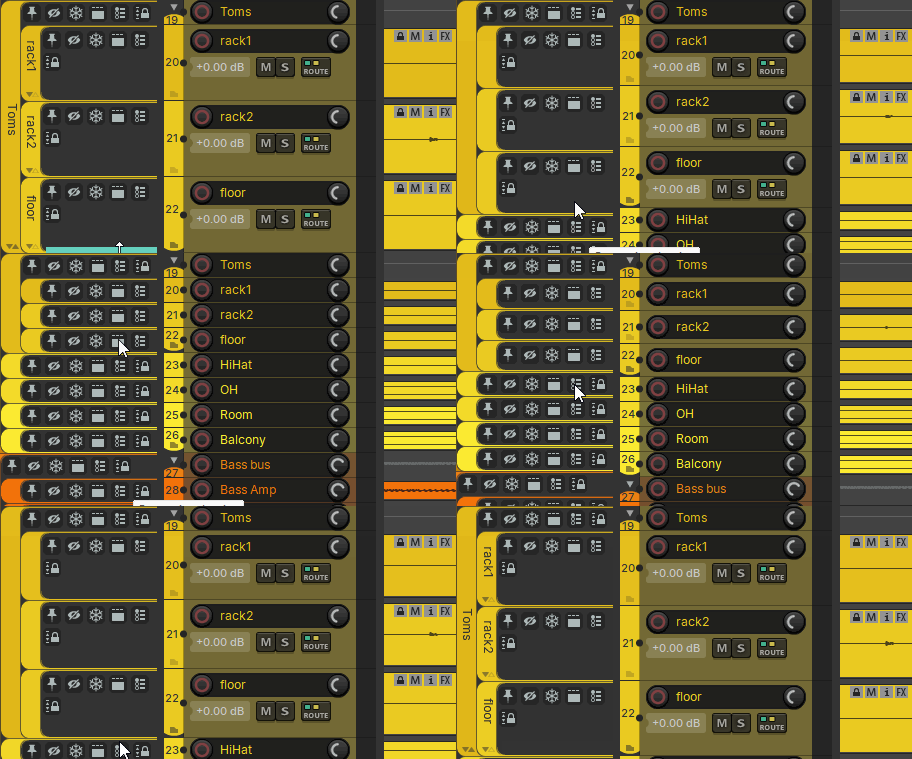
...and if you do this on a small semi-collapsed folder, it'll seamlessly disable the collapsed state and continue proportionally resizing.
Track Buttons

Track Pinning
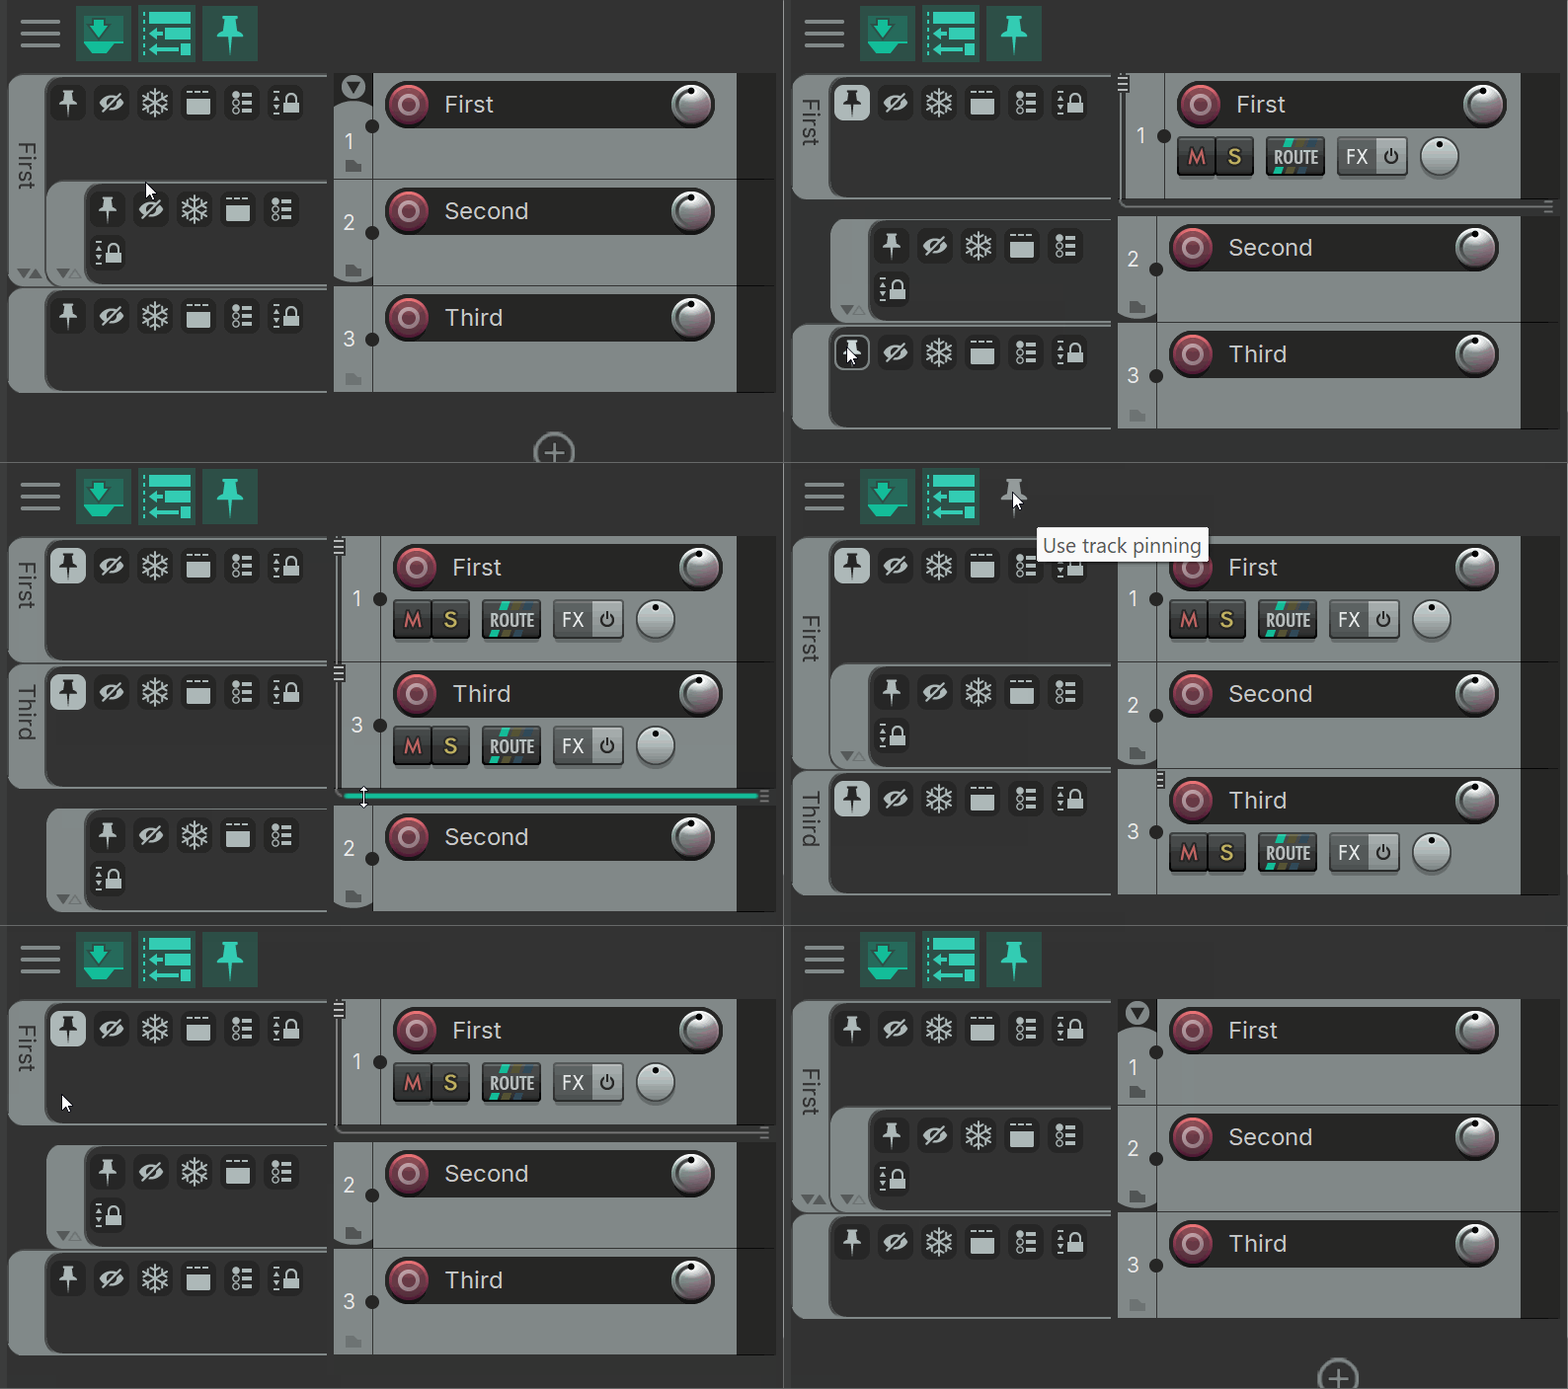
Reaper's track pinning functionality allows you to pin tracks to the top of the arrange window, and exclude them from scrolling. It also provides an action to globally enable/disable all the track pinning you may have set. Graphical Folders assembles and represents all that graphically in one place, with a button for pinned state on each track, and a 'Use track pinning' button on its toolbar to set that global override.
Track Hiding
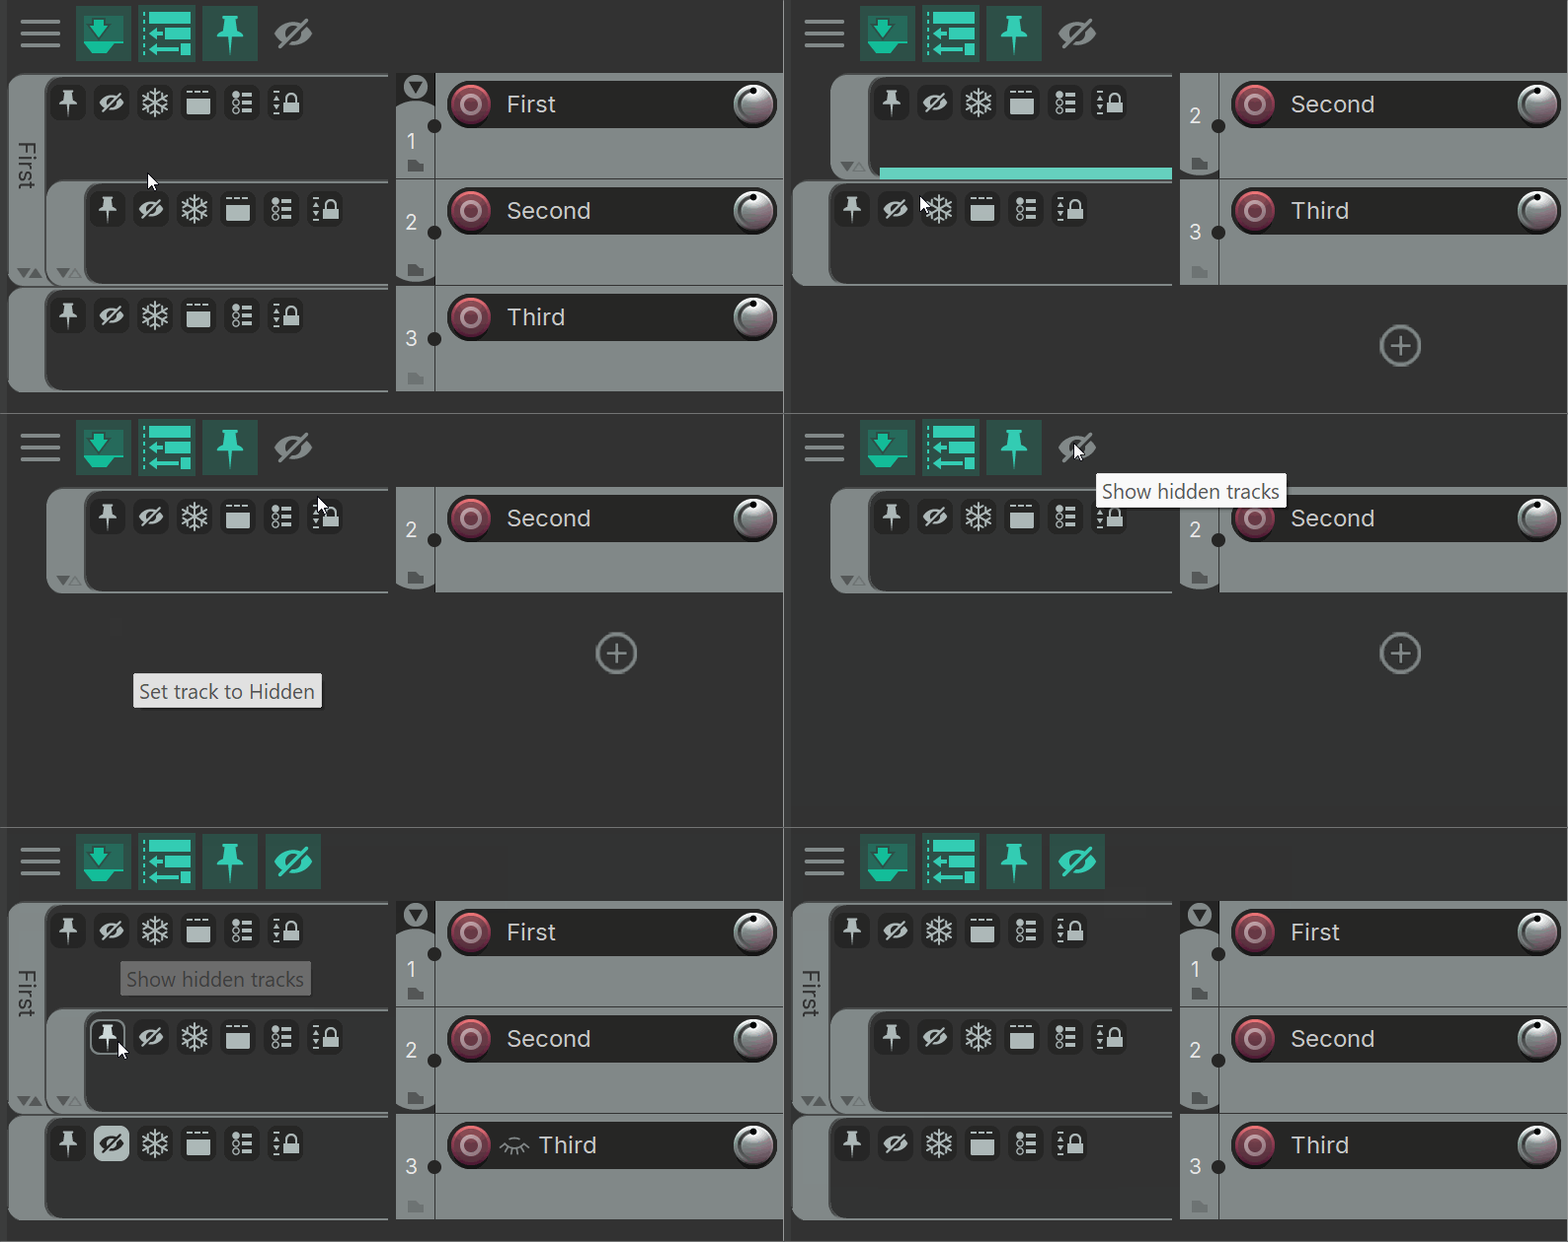
Reaper's track hiding functionality in the track manager does exactly that (and has a mixer equivalent), and there's also an action to globally show/hide your hidden tracks. InfoBlock, if you have it, will let you know which of your temporarily unhidden tracks are which. Graphical Folders assembles, and represents all that graphically in one place, with a button for hidden state on each track, and a 'Show hidden tracks' button on its toolbar to reveal all the spies in your HQ.
Track Freezing
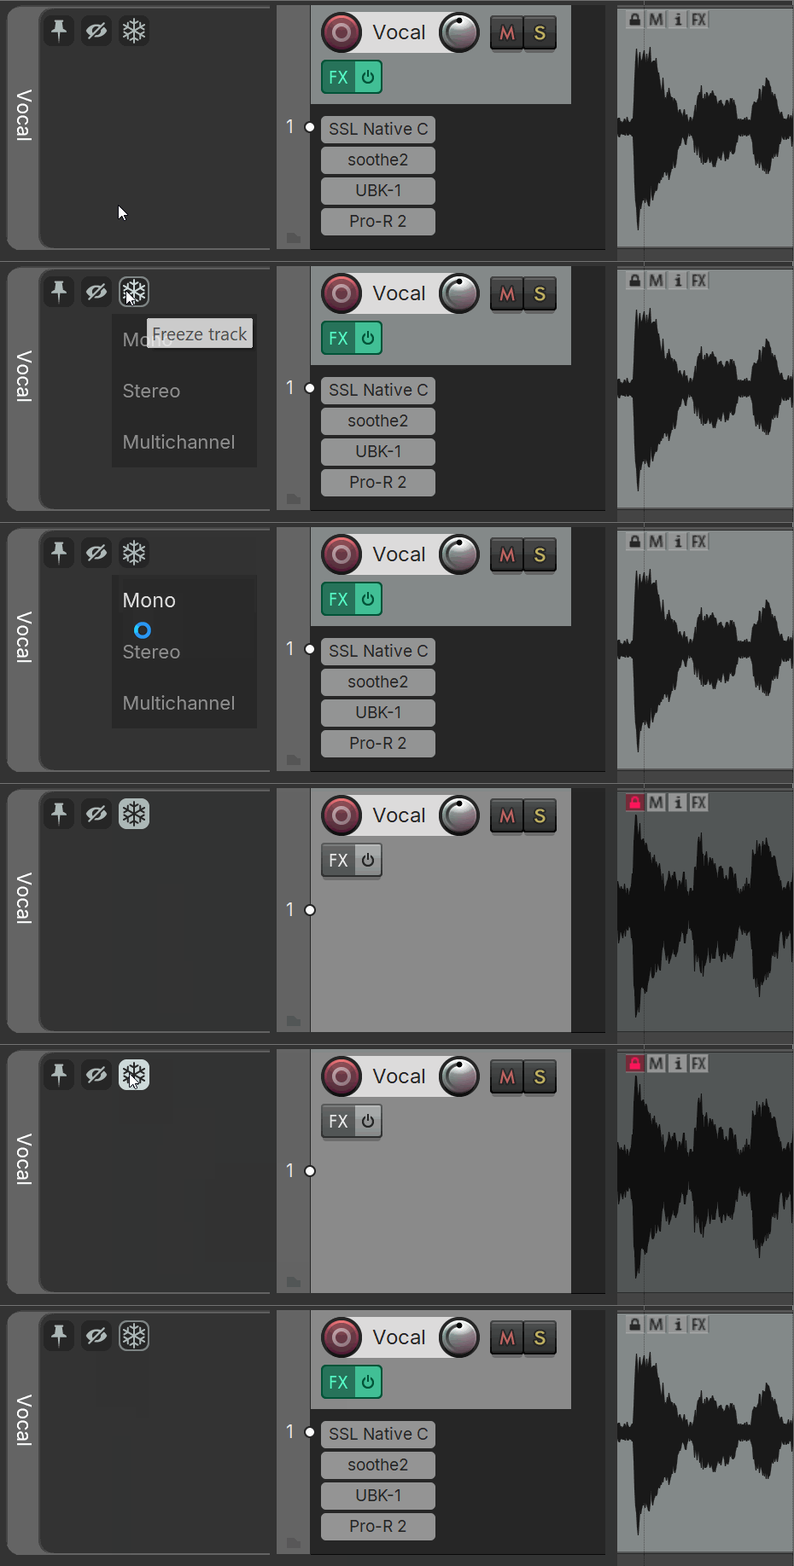
Just like right-clicking on a track panel and going to Render/freeze tracks and choosing your channels, but again, its right there on the very track to be frozen and it graphically shows that its frozen. So simple, and just click again to unfreeze.
Track spacer above - Immediate access to adding/removing a track spacer.
Fixed Item Lanes - One click for jumping the track in and out of fixed item lanes mode.
Lock height - Sets the lock track height on/off, but more importantly it shows which tracks have this set on! If you aren't familiar, the lock height setting stops the height being changed by vertical zoom changes in the arrange. Additionally, in graphical folders I've extended this principle to mean the track won't be included in the fancy proportional resizing when bottom edge dragging.
Envelopes

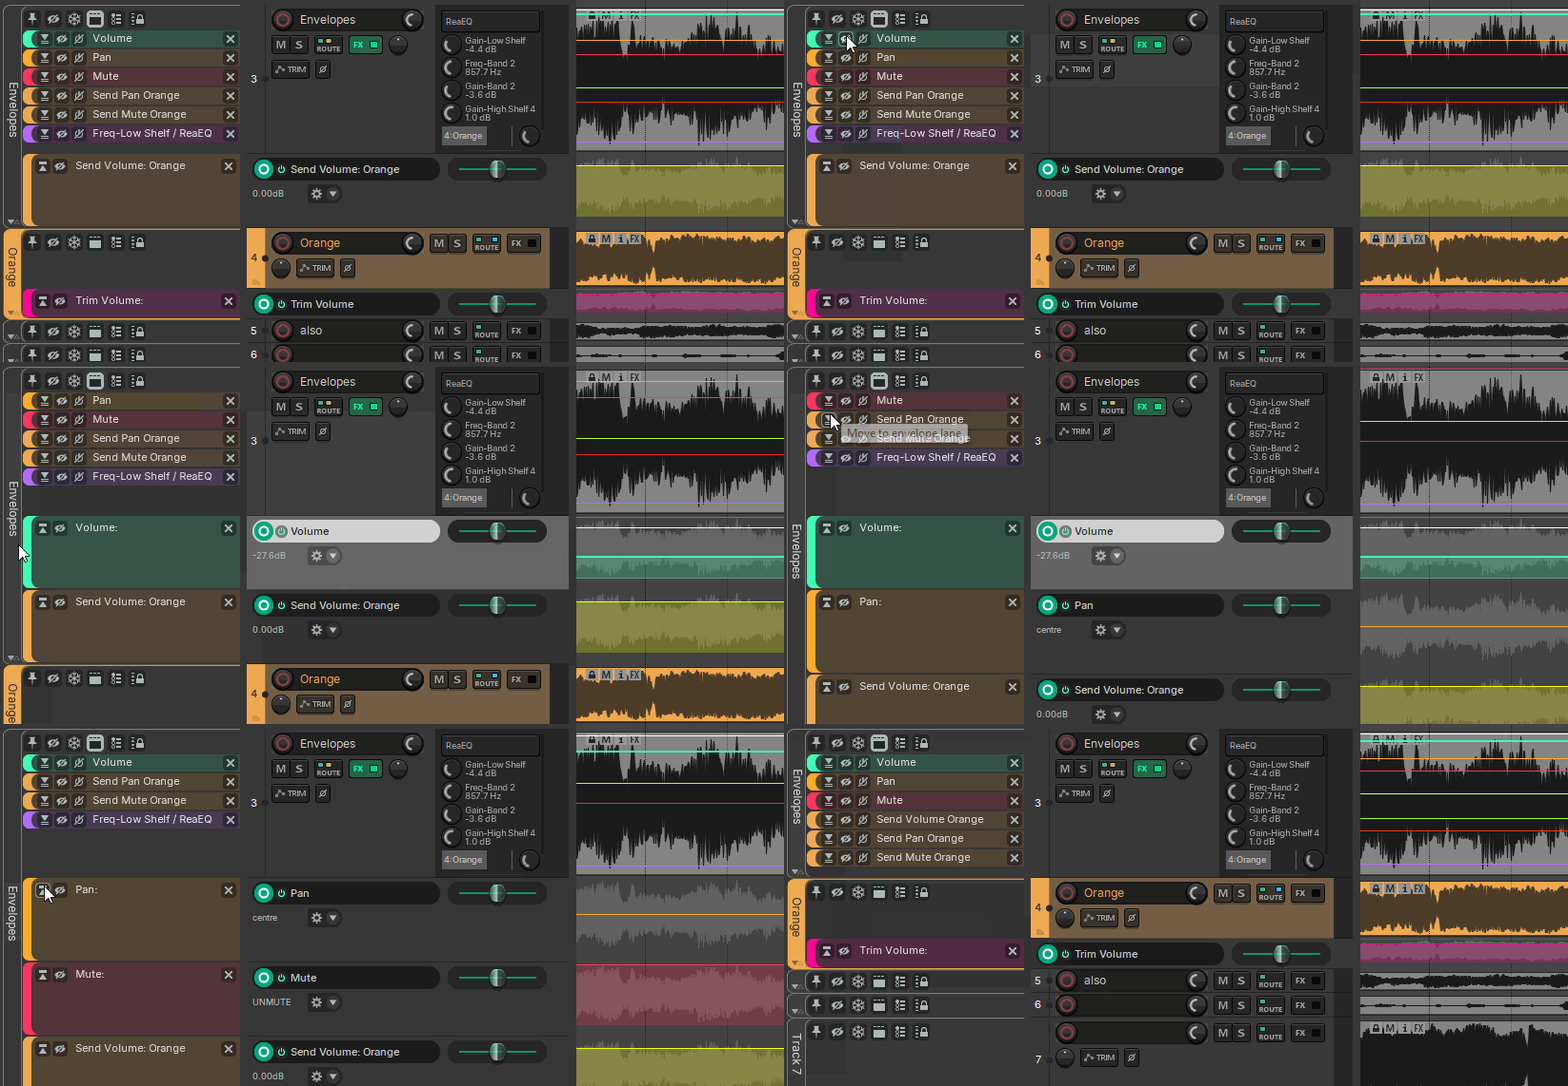
Envelopes appear as graphical envelope blocks, presented as sub-elements of the graphical track blocks, but just different enough that you won't mistake them for child tracks. They take on the colour of the envelope line (there's a toolbar button to disable that if you don't like it), and as a special case if the envelope is a send to a track with a custom colour, then it will take on that destination custom colour.
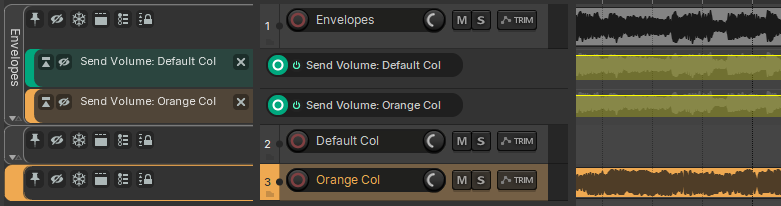
Envelopes in media lane show their name name and a bypass button. Bypassed envelopes change their colour to grey.

Each graphical envelope has a button to move it between being on the media lane and its own envelope lane. So yes, you can now fully interact with media lane envelopes without needing to look in the Envelope manager! You can also tell, by color, which envelope lane is which.
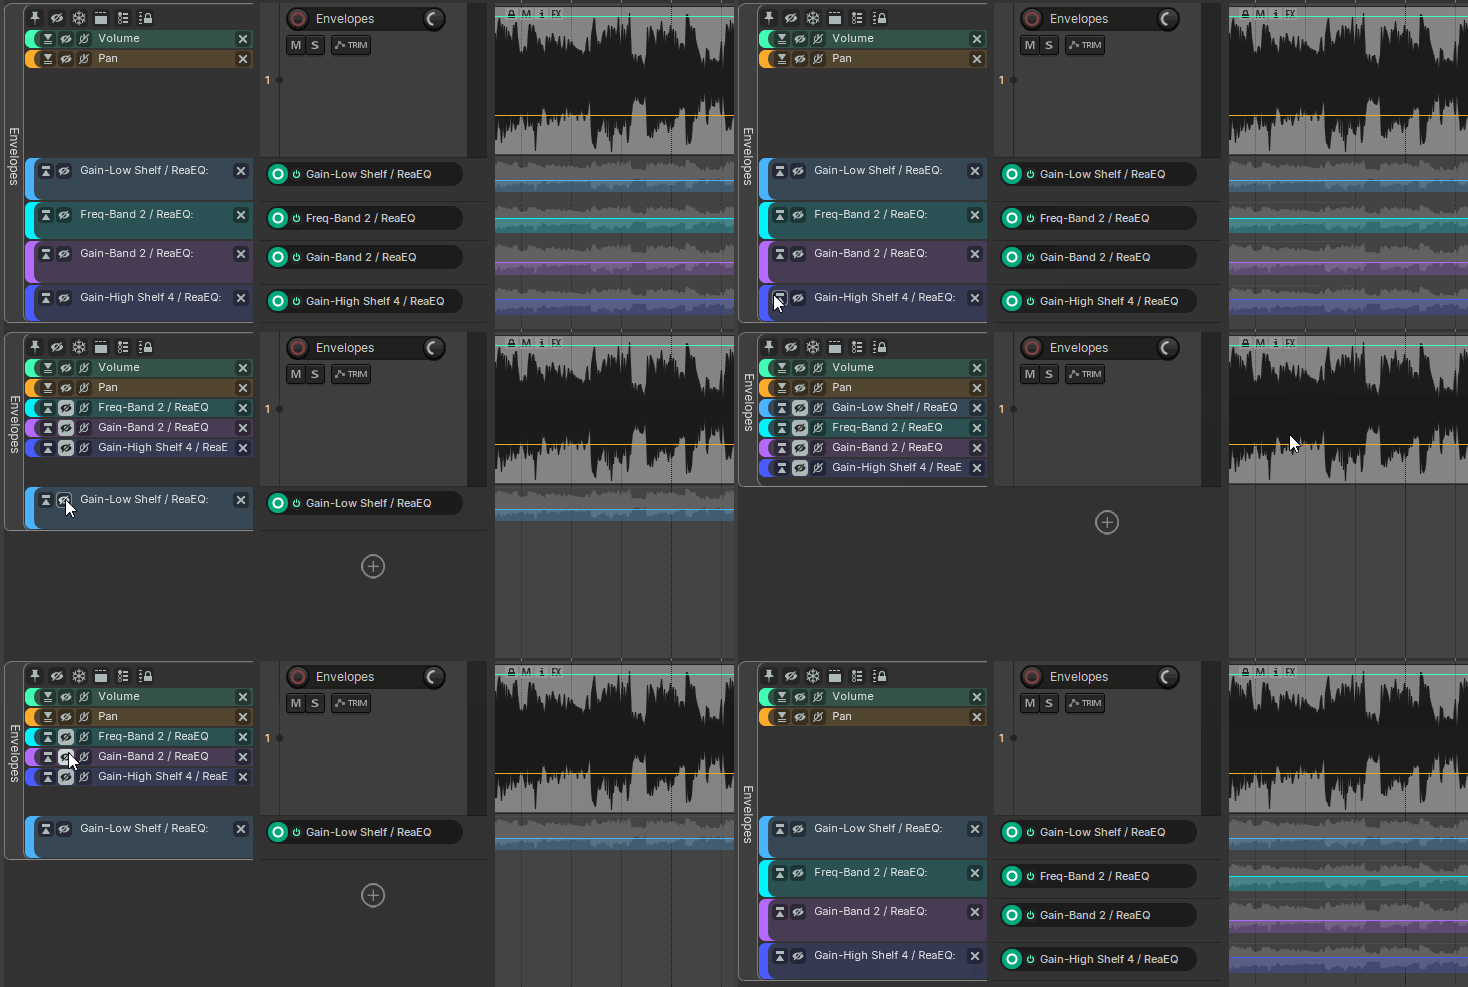
There's also a hide button, which hides the envelope, so far so normal. But that envelope still exists, right? Which can be a problem, right? Not now! The graphic gets moved to the media lane, with the hide button illuminated, and retains its controls. Choose what you want to see, and what you don't, whenever you want and with no accidents or interruptions.
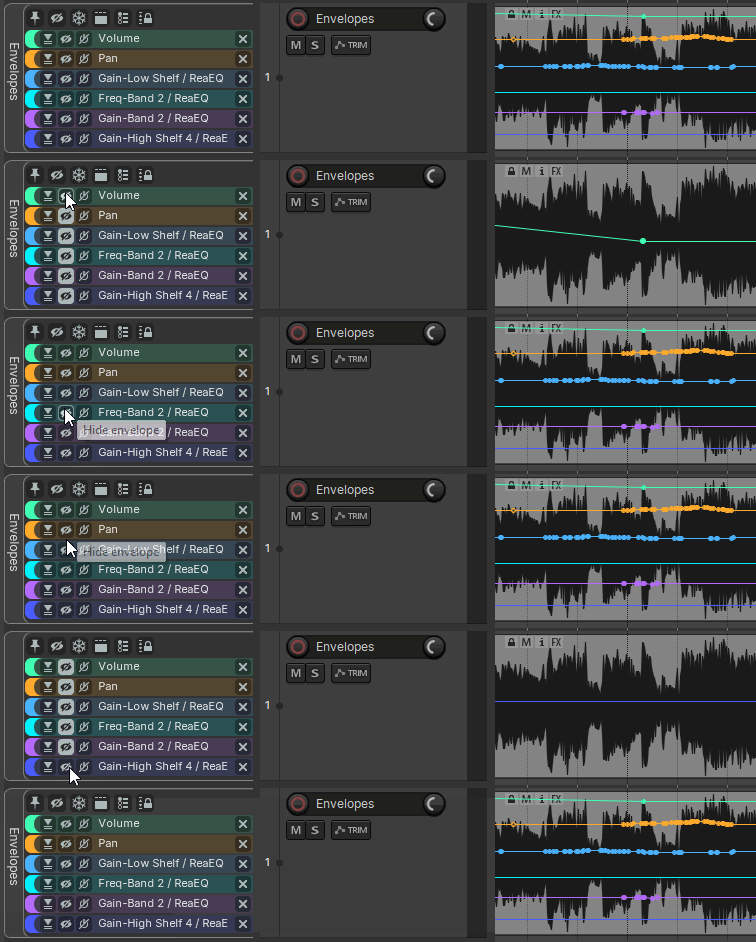
When editing a track with a number of envelopes, do you ever want to focus on just one envelope at a time? Ctrl-click the hide envelope button for 'solo envelope visibility' behaviour, here's how it works : if any of this track's envelopes are hidden, they will all be un-hidden. If none of this track's envelopes are hidden, all will become hidden except the one you clicked.
Settings Page
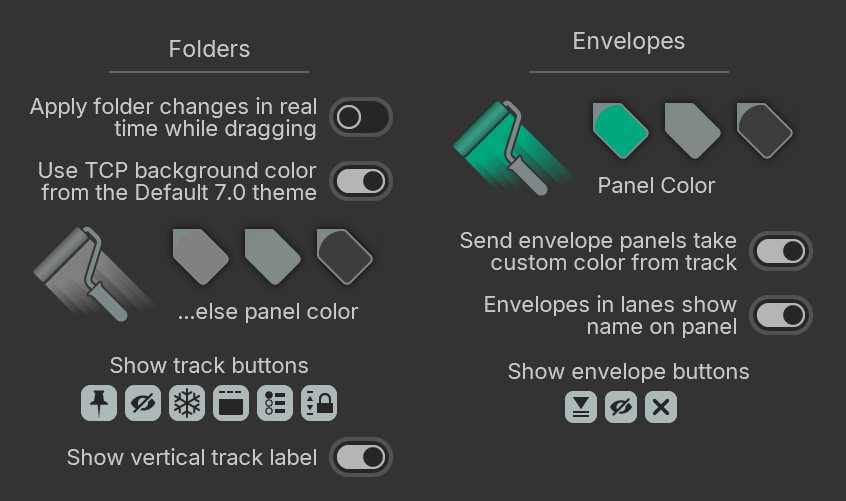
- Preference to apply changes to the folder structure, to Reaper, in real time while dragging a folder corner. This is undeniably fun, but it can be demanding in big projects, so the default is off.
- Preference to match the background of graphical track to 'TCP Background Color' from the Default 7.0 Theme (change using the Default 7.0 Theme Adjuster). Default is on.
- If not set by the above, then here is usual roller & palette tools to choose the colour for the background of graphical tracks.
- Buttons to choose which of the track buttons to show, default to all six on.
- Preference to show vertical track label, default to on.
- Choose-able colour for envelope panels (used if the envelope colouring toolbar button is off.)
- Preference for, when envelope is a send to a track with a custom colour, it takes on that destination custom colour. Default is on.
- Preference for, when an envelope is shown in its own lane and therefore has a name field, its name is also shown in its graphical envelope block. Default is off.
- Buttons to choose which of the envelope buttons to show, defaults to all three on.
Page 3Any NotesUnified presentation of Project Notes & Item Notes
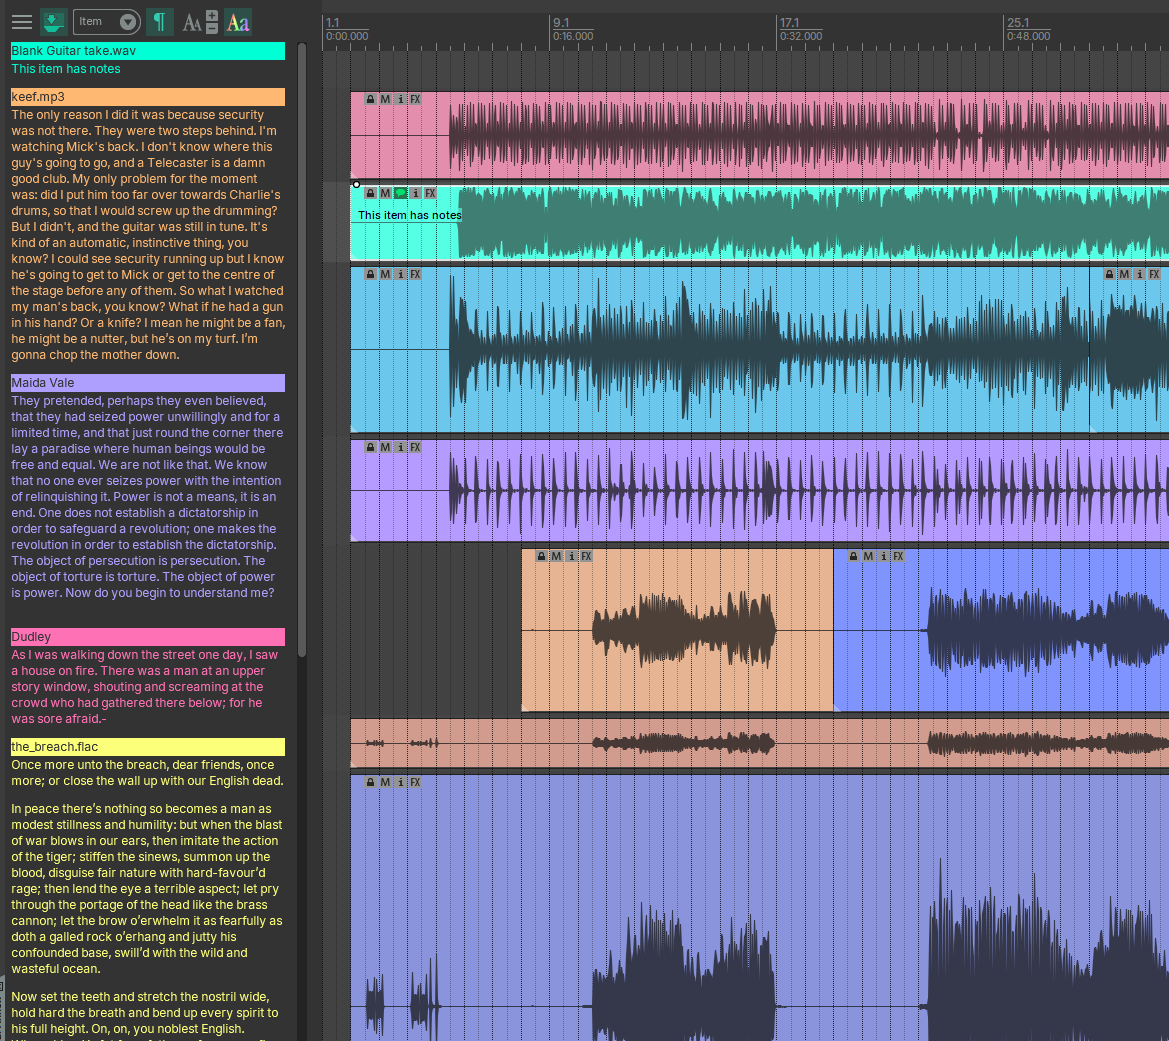
- Project Notes - As found in the 'Project Settings' dialog. Double click the text to open that.
- Item Notes - Shown for any selected items that have a track note. Double click an item note text to open its editor.
Visual Styling
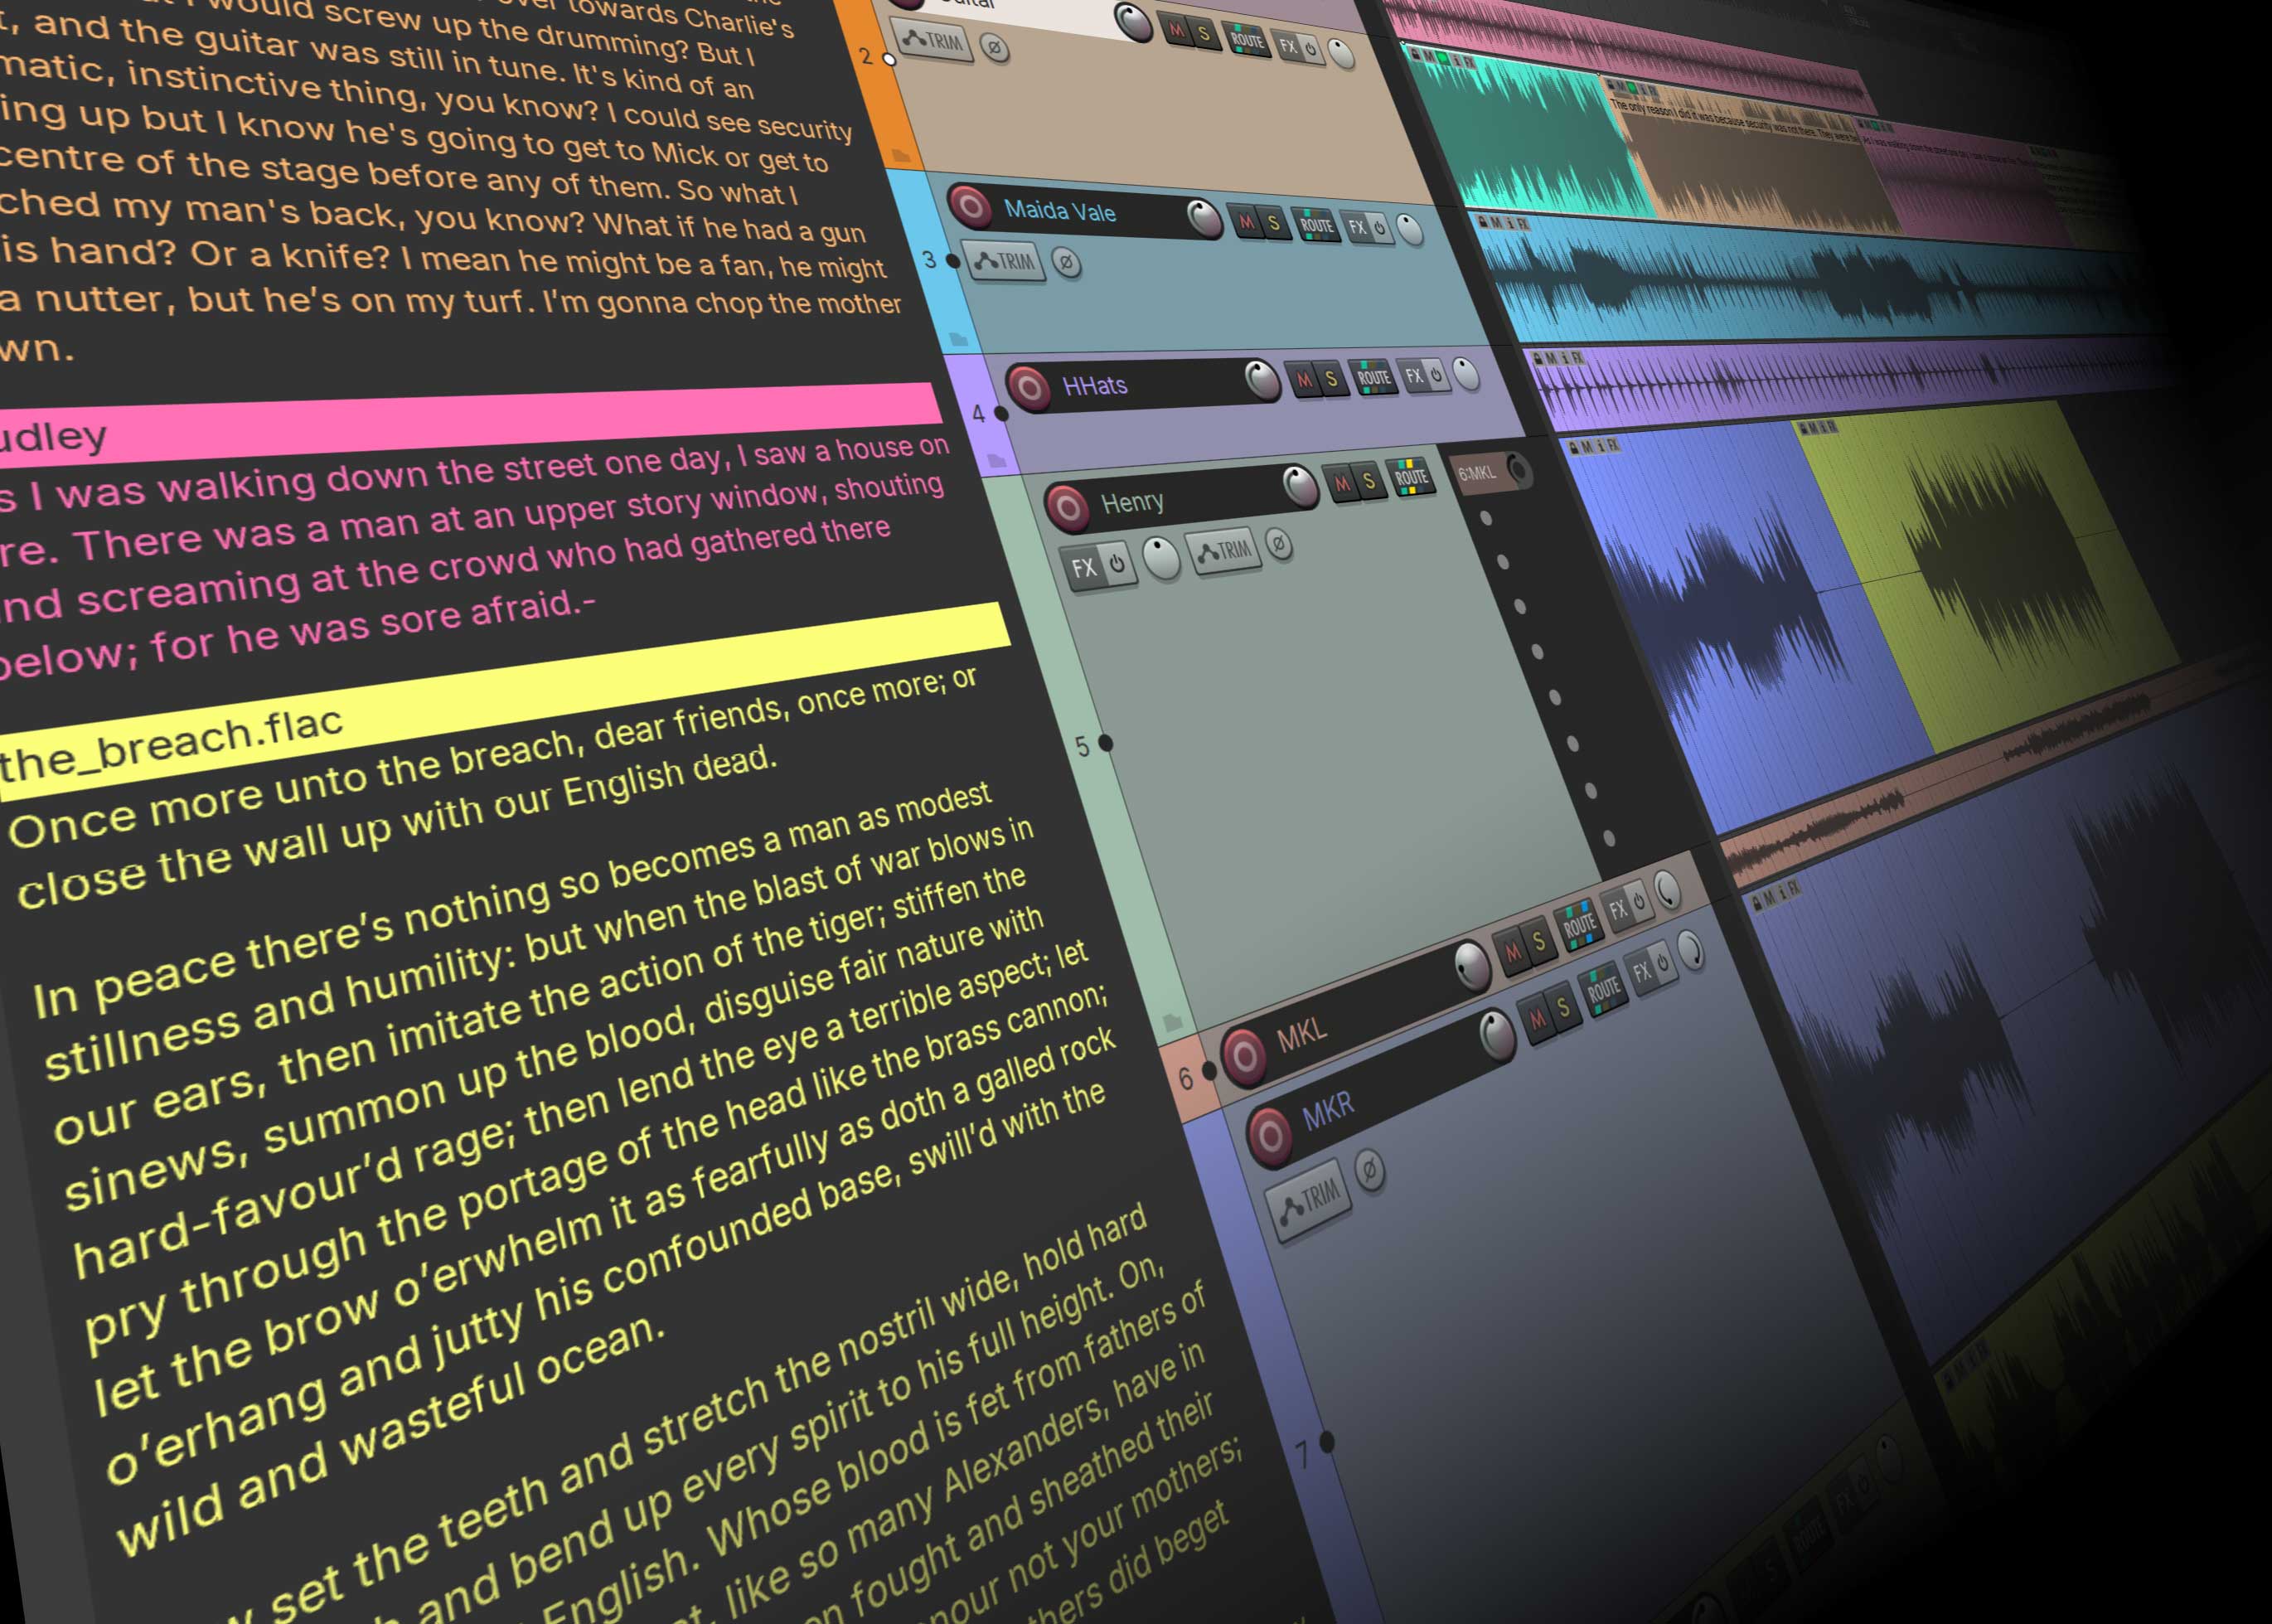
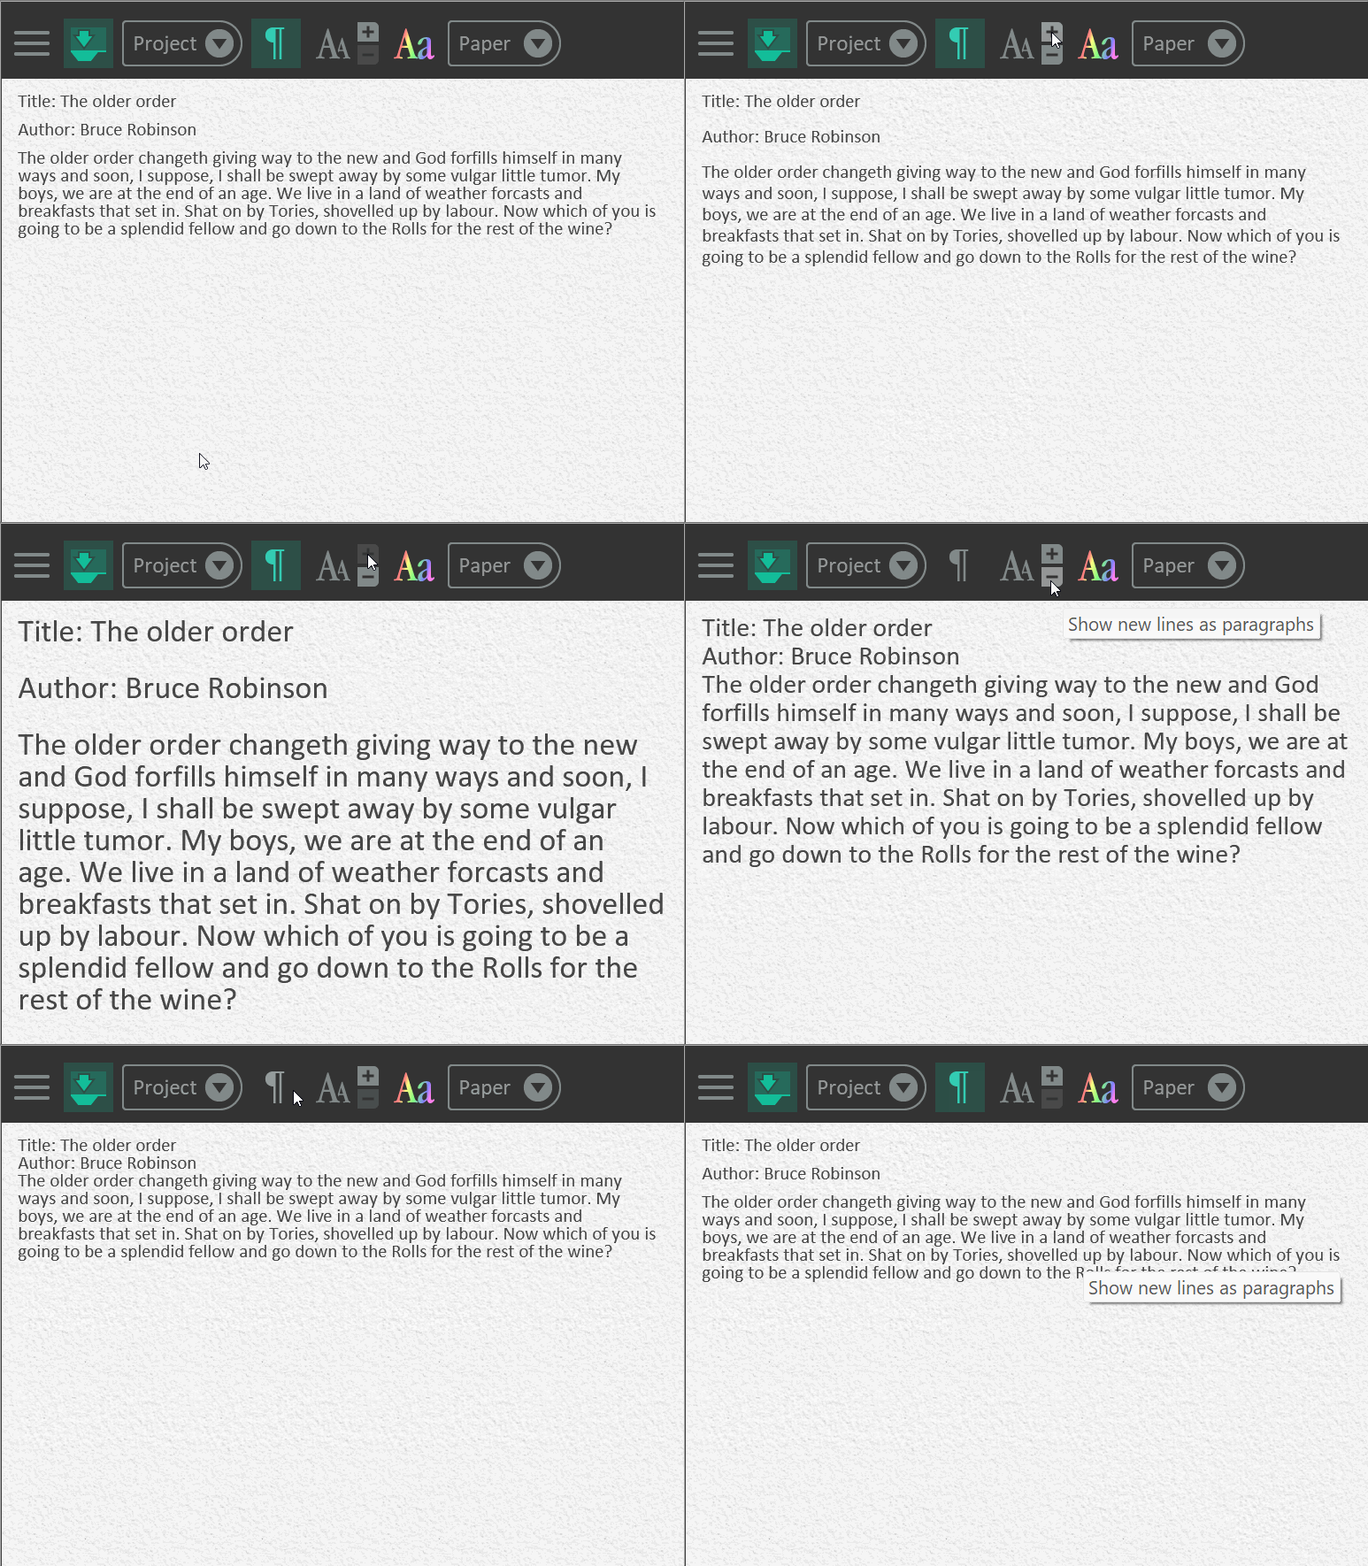
There are four styling presets, that apply to the text and background. A choice of Black, Dark, Paper & White. There is a toolbar button to set line breaks to be recognised as paragraphs. The track text blocks are locked to the height of their corresponding TCP track, so they get a scrollbar if their content doesn't fit. Size is widely adjustable, increasing both font size and line spacing:
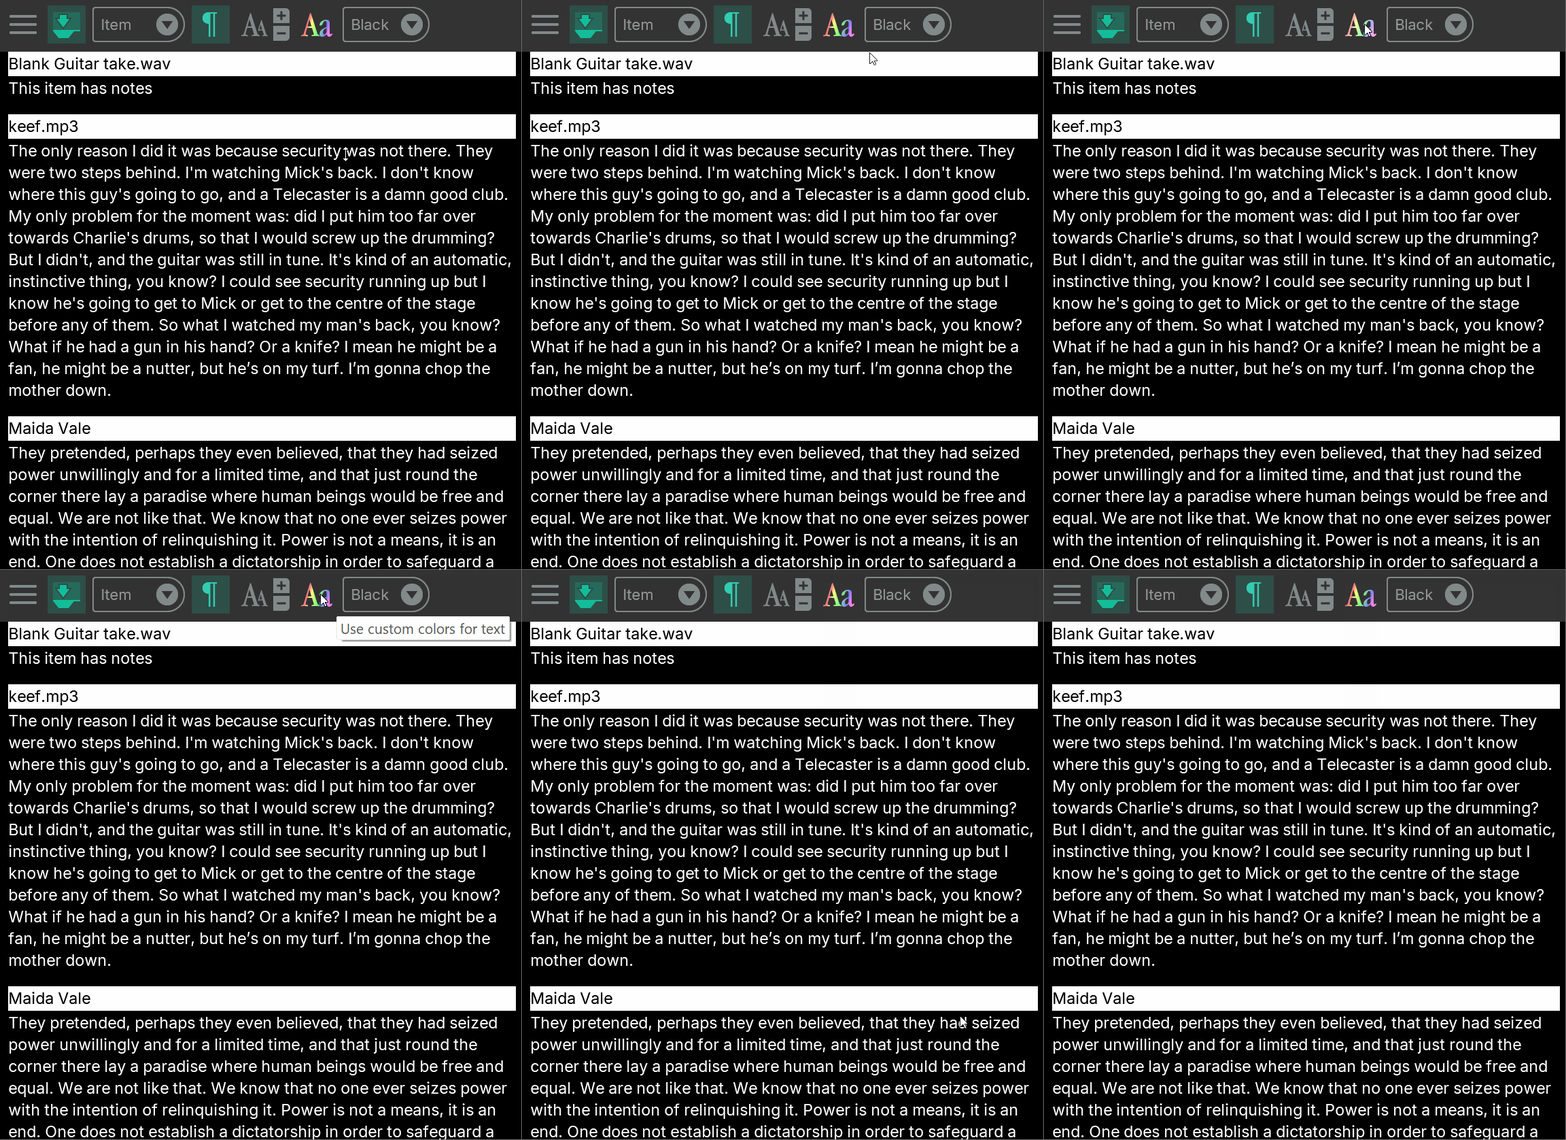
Track note text can take on the track colour if there is one, Item note text can take on the item colour if there is one, if not then the track colour if there is one:
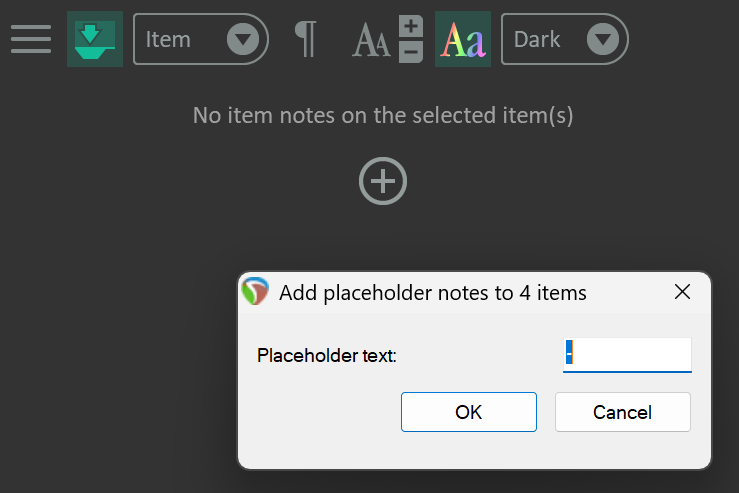
When looking at item notes, if none of the selected media items has one, click the (+) button to add an item note to them all with the placeholder text of your choice.